
How to use the ComfyUI API with Streamlit
“앞으로 개인적인 언어능력 향상 및 외국인 분들의 편의를 위해 영어로 글을 작성할 예정입니다. 영어가 자연스럽지 못해도 양해 부탁 드립니다.”
“From now on, I plan to write posts in English for my personal language improvement and for the convenience of foreign visitors. I ask for your understanding if my English is not natural.”
Intro
In the field of image generation, the most commonly used library for model deployment is Hugging Face’s Diffusers. Diffusers has implemented various Diffusion Pipelines that allow for easy inference with just a few lines of code.
The Diffusion models that form the basis of image generation models have various sub-models and numerous parameters. Being able to bundle these into a single Pipeline for easy inference is a significant advantage.
However, even the user-friendly and convenient Diffusers library has its limitations. In cases where you want to add more complex algorithms beyond simply generating images, or when you need to use algorithms not implemented in Diffusers, engineers may need to modify the library directly to create new pipelines, which can be burdensome.
On the other hand, ComfyUI, which has greatly evolved alongside Automatic1111, allows individuals to independently develop specific nodes that perform only the necessary tasks. These can be combined with nodes created by others to create unique workflows, enabling quick application of the latest models and technologies.
However, ComfyUI was primarily designed for non-engineers to easily generate images using a GUI in their local environment. As a result, there isn’t much information on how to allow others to run your workflow.
Therefore, in this post, I will write a simple tutorial on how to enable users accessing a Streamlit-based web application to run a ComfyUI workflow and generate images directly. (Basic knowledge of ComfyUI is required to follow the content of this post.)
Demo
ComfyUI Workflow
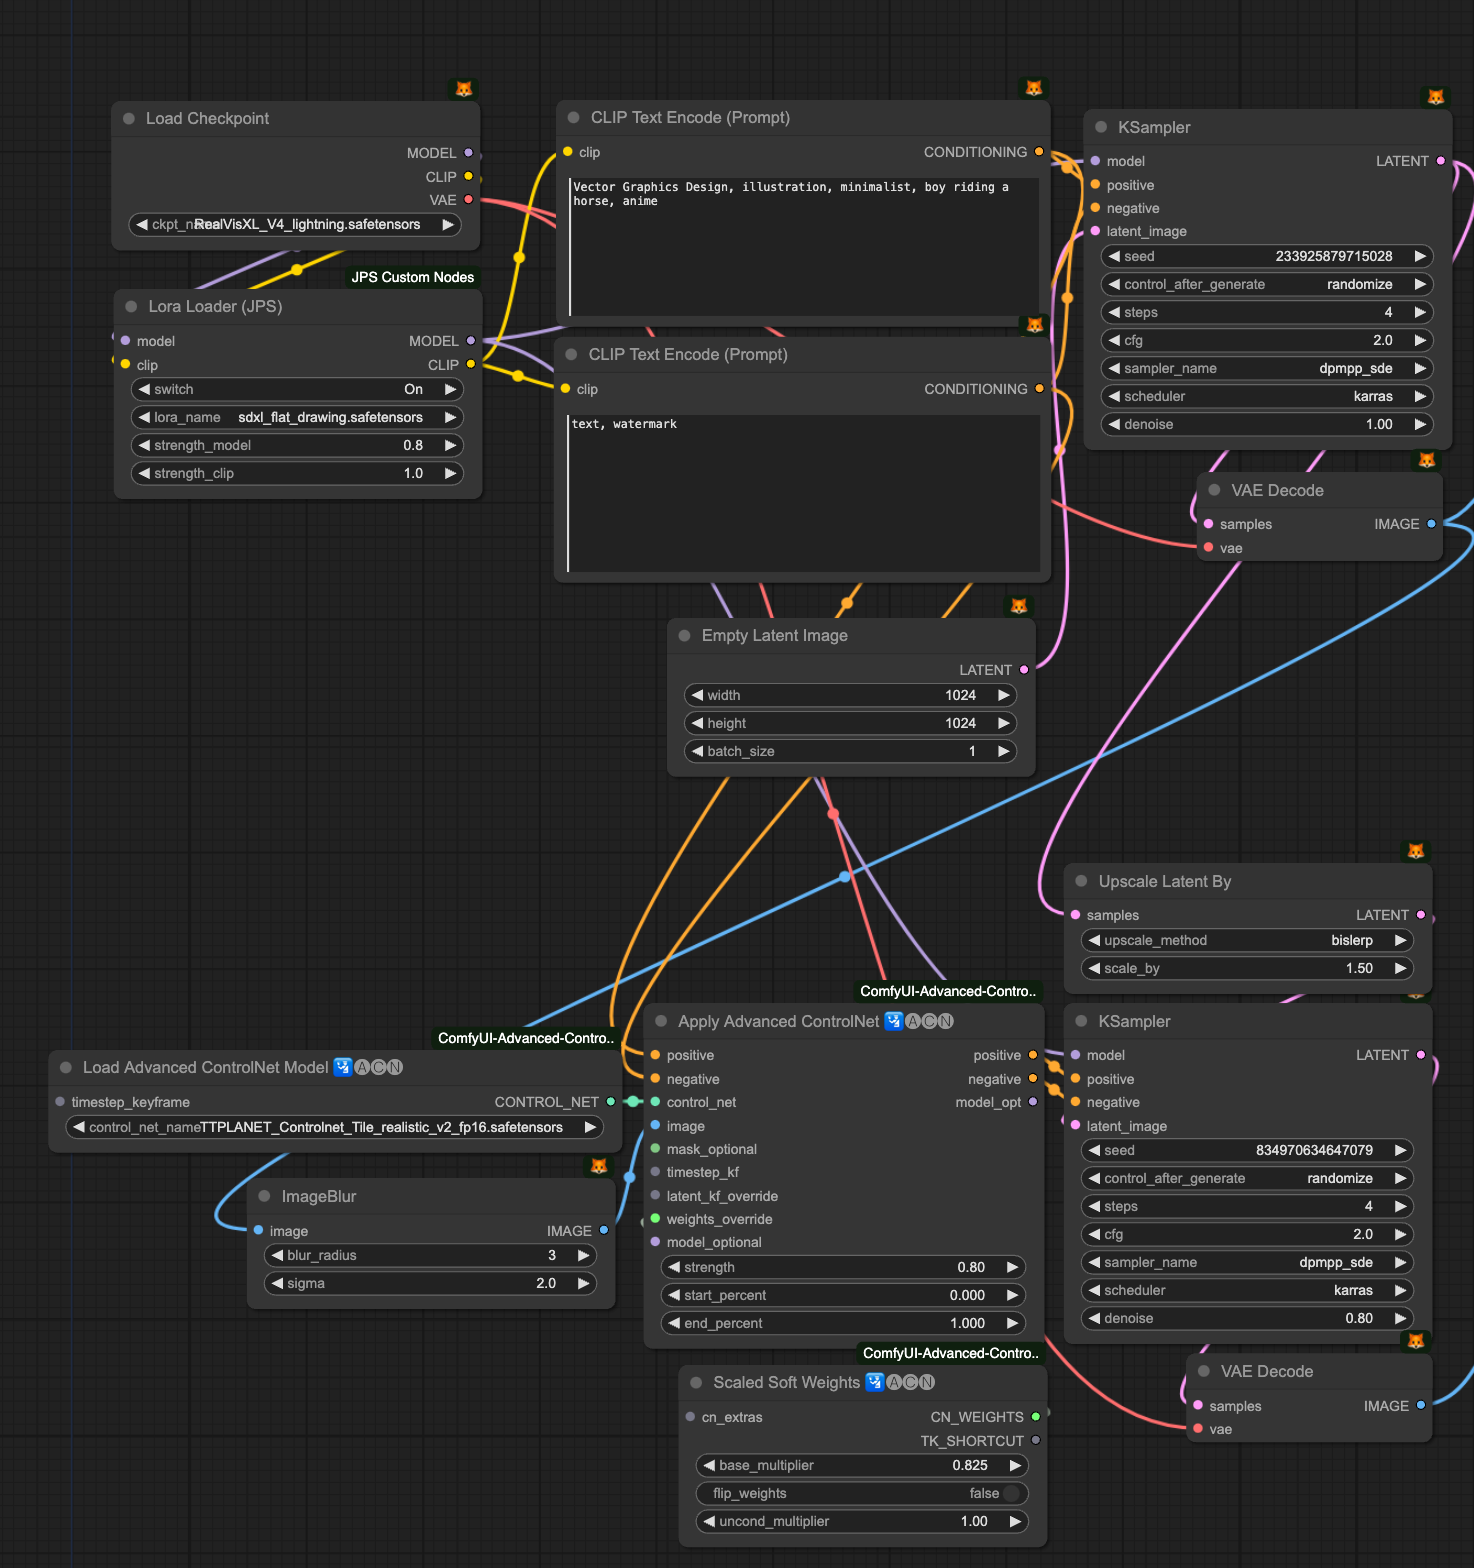
In this tutorial, we will use a simple Image to Image workflow as shown in the picture above. We’ll quickly generate a draft image using the SDXL Lightning model, and then use Tile Controlnet to resample it to a 1.5 times larger image to complement and upscale the image.
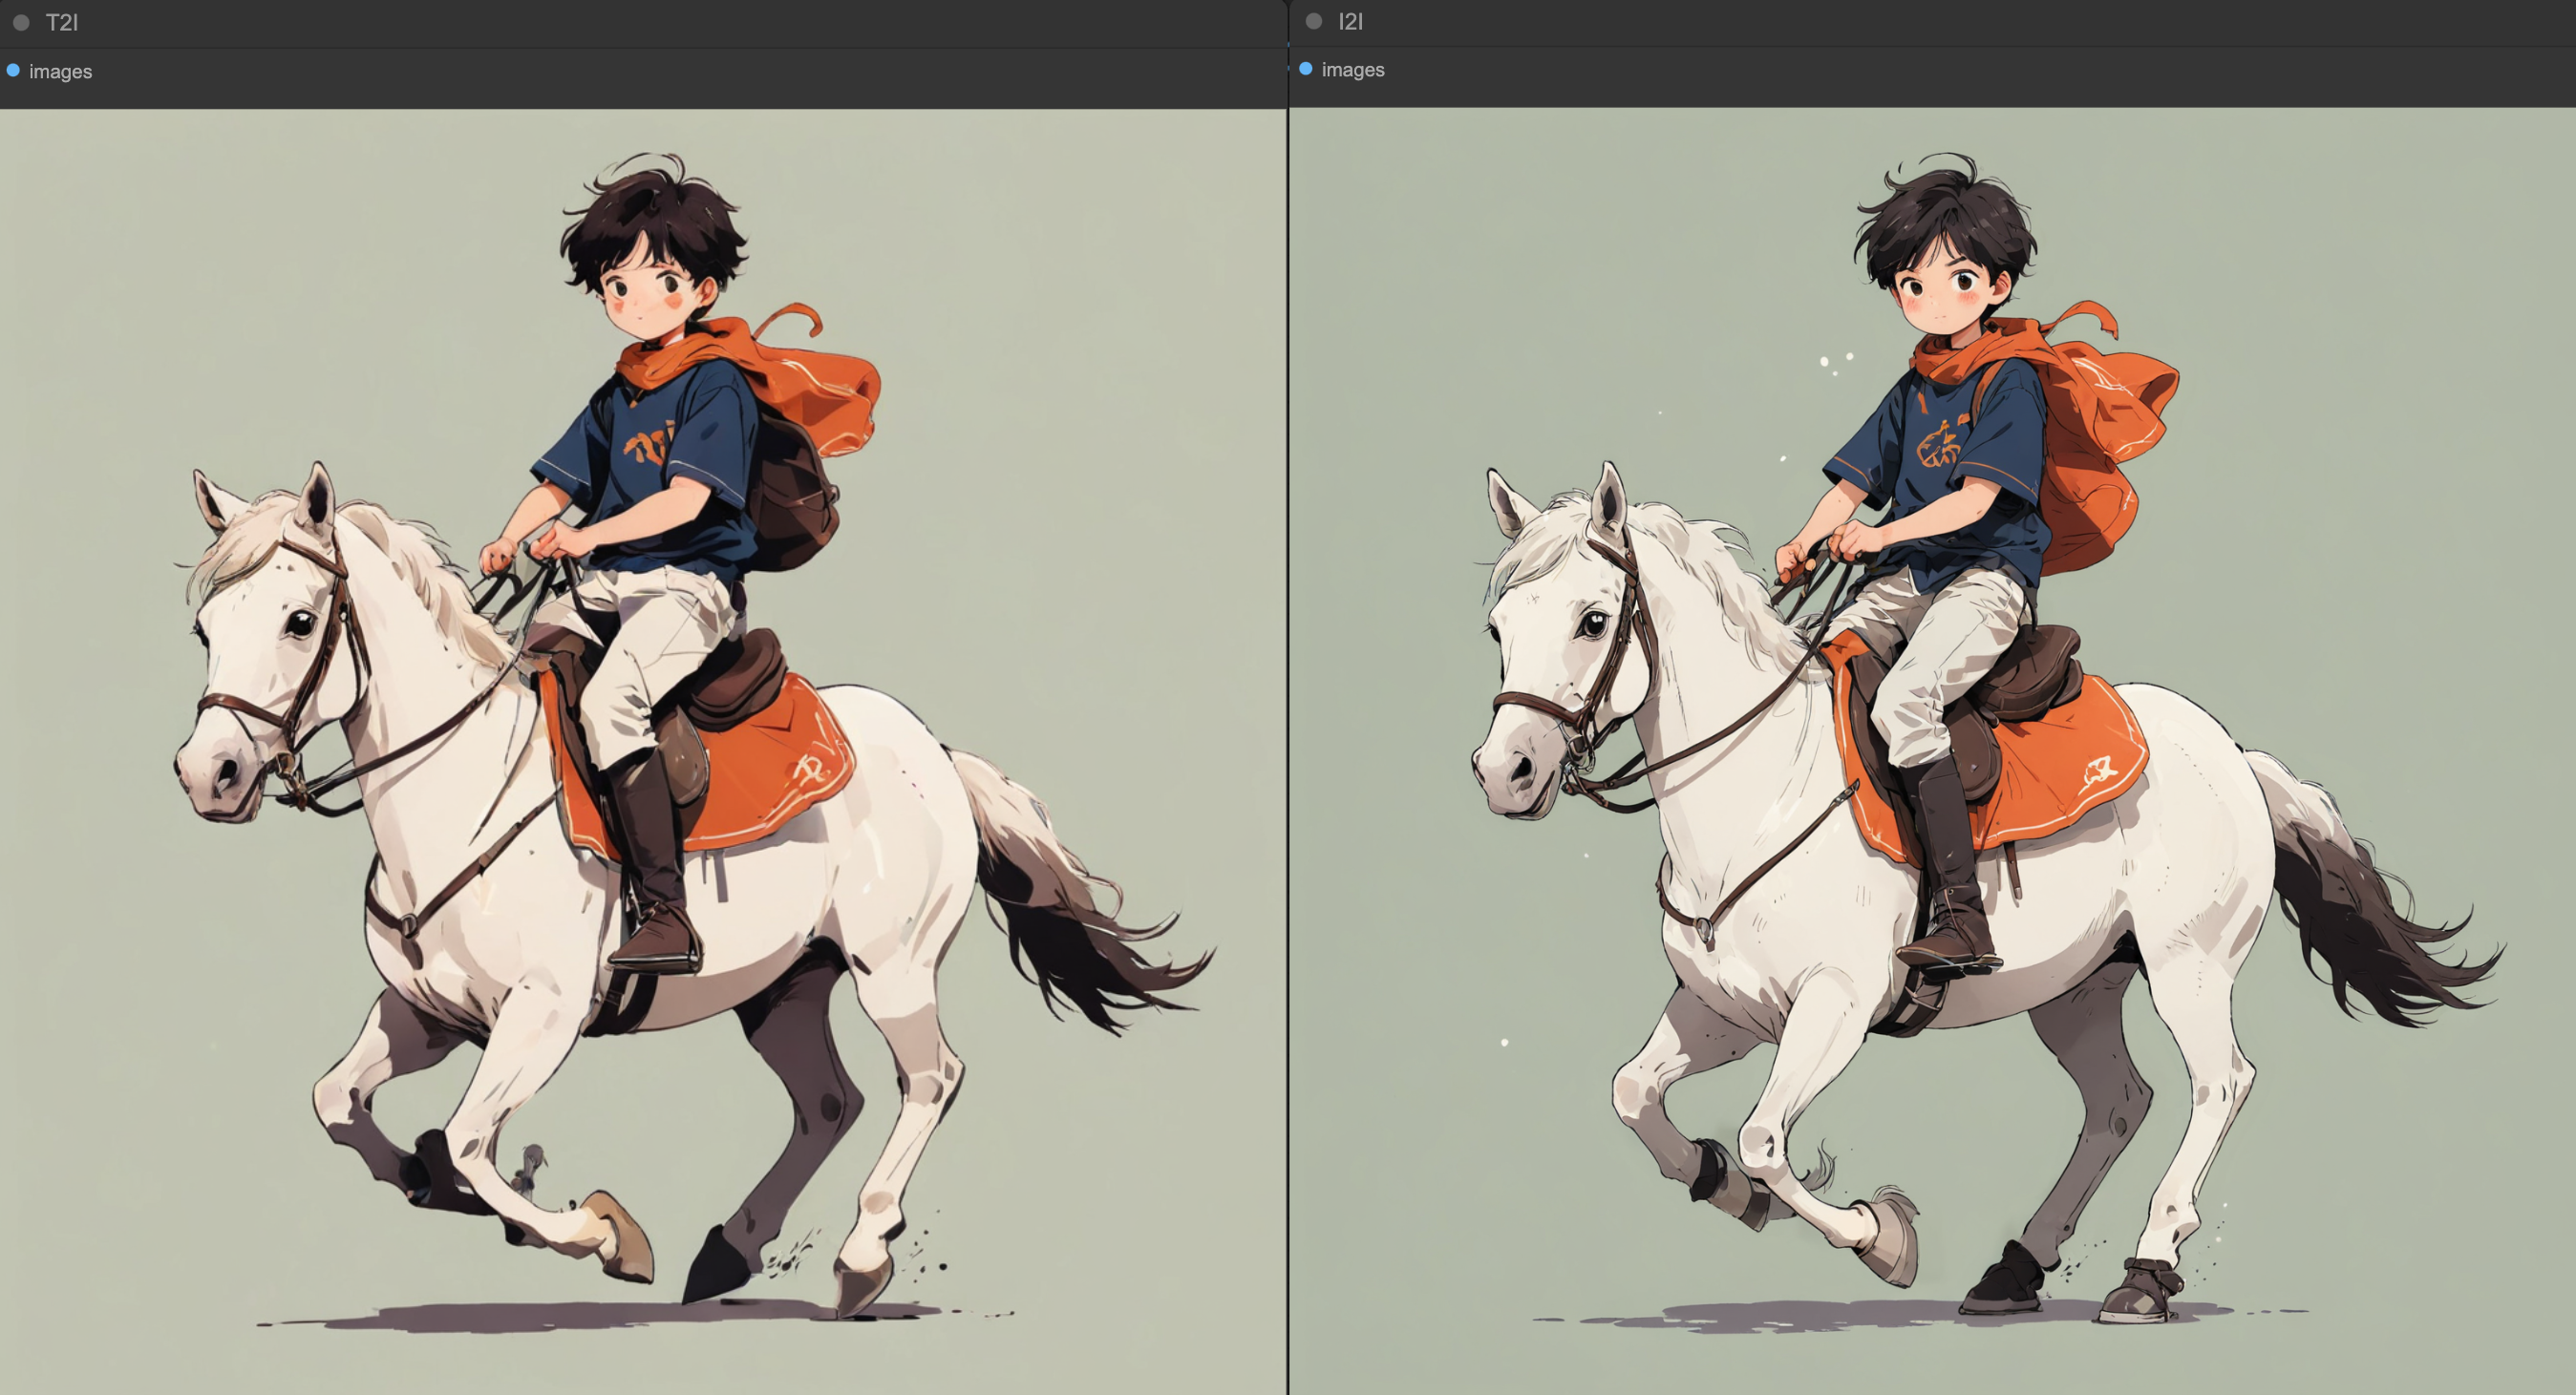
The image on the left is the Text2Image draft, and the one on the right is the Image2Image result. The right image is clearly cleaner and shows improved details.
ComfyUI API
To run a ComfyUI Workflow externally, you need to create the workflow in JSON format. Fortunately, ComfyUI supports converting to JSON format for API use.

Enable Dev mode
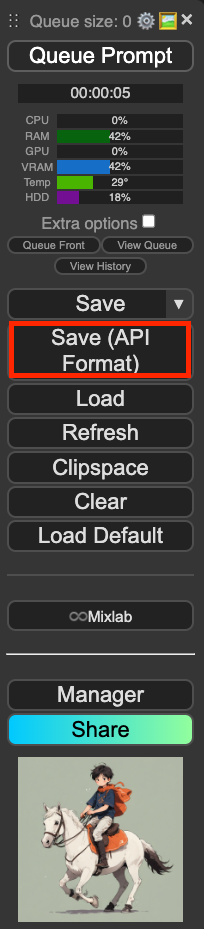
Check the Save API Format
As shown above, if you check the developer mode in ComfyUI settings, a ‘Save (API Format)’ button will appear in the navigation bar. The workflow saved in JSON format is structured as follows
  "3": {
    "inputs": {
      "seed": 233925879715028,
      "steps": 4,
      "cfg": 2,
      "sampler_name": "dpmpp_sde",
      "scheduler": "karras",
      "denoise": 1,
      "model": [
        "15",
        0
      ],
      "positive": [
        "6",
        0
      ],
      "negative": [
        "7",
        0
      ],
      "latent_image": [
        "5",
        0
      ]
    },
    "class_type": "KSampler",
    "_meta": {
      "title": "KSampler"
    }

...
Each node is distinguished by an ID (in this case, 3) and has three keys in detail: inputs, class_type, and _meta. We will use this JSON structure of ComfyUI to modify the JSON according to the user’s input parameters (batch size, seed, prompt, etc.) and write code to send requests from Streamlit (client) to the ComfyUI web server. Before that, we need to first understand how the ComfyUI web server works.
ComfyUI Web Server
The Web server of ComfyUI can be examined in detail in the server.py file on ComfyUI’s official GitHub.
The core of the ComfyUI Web Server is asynchronous processing using the aiohttp library and web sockets. Asynchronous processing allows other tasks to be performed even during inference, such as modifying node parameters or uploading images while a Queue is running.
Web sockets allow the server to continuously send the progress of the Queue to the client once connected. In the field of image generation, unlike other vision models, it takes relatively longer to infer (several seconds to tens of seconds) because internally, a model called Unet removes noise over several steps to generate images.
Of course, it has become possible to significantly reduce inference time using recent Hyper, Turbo, Lightning SDXL models or LCM, but it still requires some time if Img2Img workflows are needed continuously or if upscaling is included as in the above workflow.
Rather than making users (clients) who are unaware of this situation wait blindly until the inference is complete, it would provide a better user experience if we could show the current progress.
Let’s briefly go over the important APIs in server.py.
websocket_handler
@routes.get('/ws')
async def websocket_handler(request):
    ws = web.WebSocketResponse()
    await ws.prepare(request)
    sid = request.rel_url.query.get('clientId', '')
    if sid:
        # Reusing existing session, remove old
        self.sockets.pop(sid, None)
    else:
        sid = uuid.uuid4().hex

    self.sockets[sid] = ws

    try:
        # Send initial state to the new client
        await self.send("status", { "status": self.get_queue_info(), 'sid': sid }, sid)
        # On reconnect if we are the currently executing client send the current node
        if self.client_id == sid and self.last_node_id is not None:
            await self.send("executing", { "node": self.last_node_id }, sid)

        async for msg in ws:
            if msg.type == aiohttp.WSMsgType.ERROR:
                logging.warning('ws connection closed with exception %s' % ws.exception())
    finally:
        self.sockets.pop(sid, None)
    return ws
This code defines a WebSocket handler using the aiohttp library to manage WebSocket connections. The main functionalities are as follows:
- WebSocket Connection Setup: Handles WebSocket connections coming through the /ws path.
- Session Management: Manages sessions using the clientId provided by the client, and creates new sessions.
- Initial State Transmission: Sends initial state information to newly connected clients.
- Current Execution State Transmission: If the client is currently running, it sends information about the currently executing nodes.
post_prompt
@routes.post("/prompt")
async def post_prompt(request):
    logging.info("got prompt")
    resp_code = 200
    out_string = ""
    json_data =  await request.json()
    json_data = self.trigger_on_prompt(json_data)

    if "number" in json_data:
        number = float(json_data['number'])
    else:
        number = self.number
        if "front" in json_data:
            if json_data['front']:
                number = -number

        self.number += 1

    if "prompt" in json_data:
        prompt = json_data["prompt"]
        valid = execution.validate_prompt(prompt)
        extra_data = {}
        if "extra_data" in json_data:
            extra_data = json_data["extra_data"]

        if "client_id" in json_data:
            extra_data["client_id"] = json_data["client_id"]
        if valid[0]:
            prompt_id = str(uuid.uuid4())
            outputs_to_execute = valid[2]
            self.prompt_queue.put((number, prompt_id, prompt, extra_data, outputs_to_execute))
            response = {"prompt_id": prompt_id, "number": number, "node_errors": valid[3]}
            return web.json_response(response)
        else:
            logging.warning("invalid prompt: {}".format(valid[1]))
            return web.json_response({"error": valid[1], "node_errors": valid[3]}, status=400)
    else:
        return web.json_response({"error": "no prompt", "node_errors": []}, status=400)
This code is a function that handles HTTP POST requests coming to the /prompt path.
- If there’s a ‘prompt’ key in the JSON data, it uses this to set the prompt.
- It validates the prompt using the execution.validate_prompt method.
- If the prompt is valid, it generates a new prompt ID and adds it to the prompt queue.
- As a response, it returns the prompt ID, number, and node error information.
Streamlit(client)
The UI is simply configured to receive batch_size, seed, and prompt as input from the user. Let’s look at a few essential functions needed on the client side to see how these parameters are used to communicate with the server.
request_inference
def request_inference(server_address, prompt, batch_size, seed):
    client_id = str(uuid.uuid4())

    with open("workflows/workflow_api.json", "r", encoding="utf-8") as f:
        workflow_jsondata = f.read()

    workflow = json.loads(workflow_jsondata)

    new_workflow = update_workflow(workflow, prompt, seed, batch_size)

    st.session_state["server_address"] = server_address
    st.session_state["client_id"] = client_id
    st.session_state["new_workflow"] = new_workflow
    ws = websocket.WebSocket()
    ws.connect("ws://{}/ws?clientId={}".format(server_address, client_id))

    prompt_id = queue_workflow(new_workflow, server_address, client_id)['prompt_id']
    image_queue = queue.Queue()
    progress_queue = queue.Queue()

    # Start a thread to receive images
    thread = threading.Thread(target=receive_images, args=(ws, prompt_id, image_queue, progress_queue, batch_size))
    thread.start()

    progress_bar = st.sidebar.progress(0, "Initializing...")

    cnt = 0
    cols1 = st.columns((1, 1))
    cols2 = st.columns((1, 1))

    image_placeholders = [
        [cols1[0].empty(), cols1[1].empty()],
        [cols2[0].empty(), cols2[1].empty()]
    ]

    progress_text_list = ["Text to Image..", "Image to Image.."]
    img_list = []
    while thread.is_alive() or not image_queue.empty() or not progress_queue.empty():
        while not progress_queue.empty():
            progress_value = progress_queue.get()
            progress_bar.progress(progress_value, text=progress_text_list[cnt])

        while not image_queue.empty():
            image = image_queue.get()
            for i in range(len(image)):
                row = i // 2
                col = i % 2
                if row < 2 and col < 2:
                    img = image_thumbnail(image[i])
                    image_placeholders[row][col].image(img)
            img_list.append(image)
            cnt += 1

    # Ensure the thread has completed
    thread.join()

    if img_list != []:
        st.session_state["t2i"] = img_list[0]
        st.session_state["i2i"] = img_list[1]

    progress_bar.progress(100, text="Complete!")

    st.rerun()
The above code performs the following operations:
- Generate a unique client ID
- Update the workflow JSON file
- Read the workflow data from the JSON file and update it with the given prompt, seed, and batch_size values.
- Establish WebSocket connection and queue the workflow
- Connect to the server using WebSocket, queue the workflow to receive a prompt_id. Create queues to store images and progress updates.
- Start the message receiving thread
- Progress update loop
- While the thread is running or the queue is not empty, update the progress and images. Generate and display thumbnails for each image.
update_workflow
def update_workflow(workflow, prompt, seed, batch_size):
    sampler_ids = get_node_by_title(workflow, 'KSampler')
    for id in sampler_ids:
        workflow[id]["inputs"]["seed"] = seed

    empty_latent_ids = get_node_by_title(workflow, 'Empty Latent Image')
    for id in empty_latent_ids:
        workflow[id]["inputs"]["batch_size"] = batch_size

    clip_ids = get_node_by_class_type(workflow, 'CLIPTextEncode')
    for id in clip_ids:
        if workflow[id]["_meta"]["title"] == "positive_prompt":
            workflow[id]["inputs"]["text"] = "zavy-ctflt, drawing, " + prompt  # zavy-ctflt, drawing -> lora trigger words

    preview_ids = get_node_by_class_type(workflow, 'PreviewImage')
    for id in preview_ids:
        workflow[id]["_meta"]["title"] = "Send Image (WebSocket)"
        workflow[id]["class_type"] = "ETN_SendImageWebSocket"

    return workflow
The above function simply updates the parameters of a JSON workflow that has been deserialized into a Python dictionary, using keys. The part to pay special attention to here is the PreviewImage at the very bottom.
When making a request to the ComfyUI API, if the current queue in the workflow encounters a PreviewImage or SaveImage node, it is set to save the image in the ComfyUI/temp path by default. This creates the drawback of having to spend time saving images and managing the temp folder.
Fortunately, there exists a Send Image (WebSocket) that allows the output image to be sent as PNG binary data. (This node is a custom node, so it needs to be installed in ComfyUI from the link.)
Therefore, to send images to the client in a more efficient way, an additional step has been added to change the PreviewImage node to a Send Image (WebSocket) node.
receive_images
def receive_images(ws, prompt_id, image_queue, progress_queue, batch_size):
    image_batch = []
    cnt = 0
    while True:
        out = ws.recv()  # Receive WS message
        if isinstance(out, str):
            message = json.loads(out)

            if message['type'] == 'executing':
                data = message['data']
                if data['node'] is None and data['prompt_id'] == prompt_id:
                    break  # Exit the loop as the execution is complete.
            elif message['type'] == 'progress':
                data = message['data']
                if int(data['max']) == 1:  # except invert image node
                    continue

                progress_value = data['value'] / data['max']
                progress_queue.put(progress_value)

        else:  # binary image data
            image_data = np.frombuffer(out[8:], dtype=np.uint8)
            image_array_bgr = cv2.imdecode(image_data, cv2.IMREAD_COLOR)
            image = cv2.cvtColor(image_array_bgr, cv2.COLOR_BGR2RGB)

            image_batch.append(image)
            if len(image_batch) == batch_size:
                cnt +=1
                image_queue.put(image_batch)
                image_batch = []
The above function is responsible for continuously receiving and processing messages from the server connected via WebSocket.
-
if isinstance(out, str)
- This returns information about the currently running node. Especially when the message type is ‘progress’, it means that ksampler is in progress, and at this point, it calculates the progress as current step / max step and puts it into the queue to be used in the progress bar.
-
else
- This is the case when it encounters the Send Image (WebSocket) node that returns binary data. It decodes the binary data and converts it to a numpy array. At this point, using cv2’s imdecode module is more efficient than using io.BytesIO for decoding.
Other API
There may be cases where you’re not satisfied with the result from the first Text to Image process and want to run the inference again. In this case, if you simply press the Generate button again, it will remain in a waiting state until the previous Queue is completed. This is because ComfyUI doesn’t provide concurrency by default.
In the ComfyUI GUI, you can visually check all queues and cancel specific queues. So how can an external client clear the previous queue?
There are endpoints like “/queue” which deletes a specific queue using the client’s id, and “/interrupt” which deletes the currently running queue. Since ComfyUI doesn’t support concurrency, assuming there’s only one user, I’ve added a feature to delete only the currently running queue. (If multiple clients register queues, it would be good to distinguish client ids separately and delete specific queues using the “/queue” endpoint.)
The code I’ve written is as follows
def get_queue(server_address):
    # create the GET request
    req = urllib.request.Request(f"http://{server_address}/queue", method='GET')

    # sending the request and getting the response
    with urllib.request.urlopen(req) as response:
        response_data = json.loads(response.read().decode('utf-8'))

        return response_data

def cancel_running(server_address):
    url = f"http://{server_address}/interrupt"
    req_headers = {'Content-Type': 'application/json'}
    interrupt_request = urllib.request.Request(url, headers=req_headers, method='POST')

    # send request and get the response
    with urllib.request.urlopen(interrupt_request) as response:
        return response

def delete_queue(server_address, client_id):
    response = get_queue(server_address)
    try:
        task = response["queue_running"][0]
        if task[-2]["client_id"] == client_id:
            cancel_running(server_address)

    except:
        pass
This code retrieves all queue lists and, if there is a currently running queue (‘queue_running’) that matches the most recent client ID, it deletes it; otherwise, it ignores it.
This code is set to run when the Stop button is pressed or when the Streamlit page is rerun. Due to Streamlit’s structure, which reruns after any action (such as button clicks), if you change the Image Num or Seed, the page reruns, causing issues where the progress bar restarts from the beginning or stops.
Therefore, I designed it so that the queue stops when any other action is taken while an image is being generated, not just when the Stop button is pressed. I personally don’t recommend writing asynchronous logic in Streamlit (due to increased complexity and difficulty in state management) and suggest implementing it in other web applications.
END
In this post, I’ve created an example using the ComfyUI API and Streamlit to deploy an image generation workflow, allowing non-experts to generate images directly from the UI.
Many people are using ComfyUI to quickly apply very complicated workflows or the latest models. If you want to make this accessible to ordinary people, you can use the ComfyUI API as shown in this example.
However, due to the concurrency issues mentioned above, if multiple people connect to a single server, they have to wait until all the queues ahead of them are completed. Even if you physically increase the number of servers to somewhat alleviate this, loading models for each of these servers could lead to cost concerns.
To solve this concurrency issue, I’ve implemented simultaneous inference at a single endpoint using the Nvidia Triton Inference Server and ComfyUI Python Extension.
In the next post, I’ll cover this topic.
Keep Going
Leave a comment