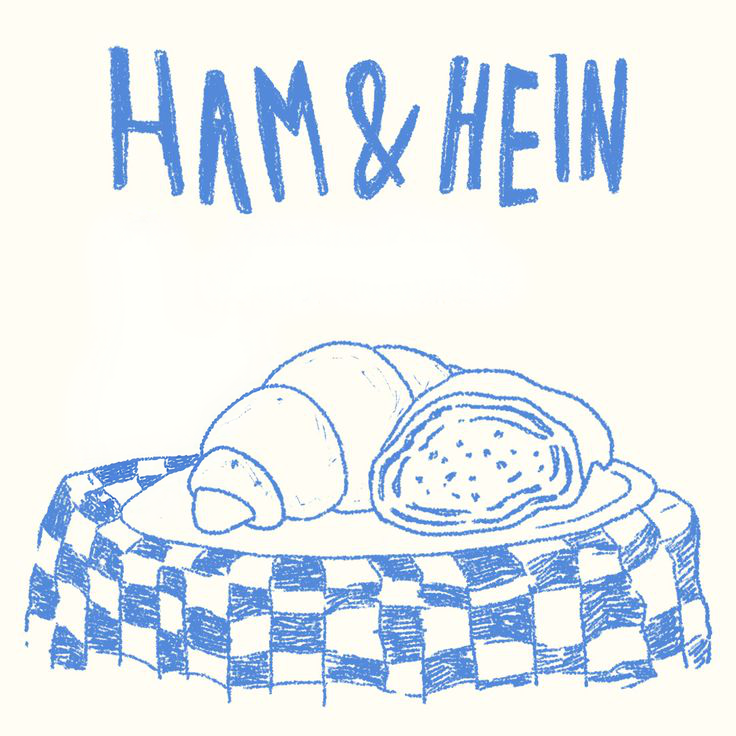
애플 인텔리전스에는 클린업(Apple Intelligence Clean Up)이라는 기능이 있습니다. 이 기능은 이미지에서 특정 부위, 물체 등을 제거하는 기술로 이미지에서 원하지 않는 부분을 쉽게 지우기 위해 사용되는 기능입니다.
Apple Intelligence Clean Up
하지만 이 기능을 써보신 분들은 내가 원하는 의도와 다르게 생성되거나 제대로 동작하지 않았던 경험이 있으실 겁니다.
저 개인적으로 이미지 생성 기술을 활용한 에디터를 개발하면서 많은 어려움이 있던 기능 중 하나도 바로 객체 제거 기술입니다. 객체를 제거하는 것 자체는 크게 어렵지 않지만 제거된 영역을 자연스러운 배경으로 채우는 것은 생각보다 쉽지 않습니다.
객체 제거를 위해 사용되는 방법은 아래와 같은 방법들이 있습니다.
알고리즘 방식의 inpainting
object removal model
diffusion based inpainting
하지만 위 세가지 방식에는 각각 한계점이 있습니다. 그래서 각 기술을 단편적으로만 사용하게 되면 좋은 결과를 얻기 어렵습니다. 하지만 이 기술들을 적절히 조합한다면 성능을 개선할 수 있습니다. 저는 많은 실험을 하면서 높은 확률로 좋은 결과물을 얻을 수 있는 최선의 조합과 파라미터를 찾았고 이에대해 공유해보려고 합니다.
Limitations
각 기술의 동작 방식과 한계점을 살펴보면 아래와 같습니다.
알고리즘 방식의 inpainting
Original Image(+mask)
Telea
Navier-Stokes
1. Telea 알고리즘
이 방법은 마스크 부분의 가장자리부터 시작하여, 주변의 픽셀 색상을 참고하여 안쪽으로 채워나가는 방식입니다. 마치 퍼즐의 빈 칸을 주변 조각들의 색과 패턴을 참고하여 채워넣는 것과 비슷합니다.
Limitations:
복잡한 무늬 재현의 어려움: 주변 픽셀의 색상만을 참고하기 때문에, 복잡한 패턴이나 질감이 있는 부분은 원래 모습과 다르게 채워질 수 있습니다.
큰 마스크 영역의 복원 제한: 마스크 영역이 클 경우, 주변 정보만으로는 자연스러운 복원이 어려울 수 있습니다.
2. Navier-Stokes 기반 알고리즘
이 방법은 이미지의 밝기 변화를 액체의 흐름처럼 생각하여, 손상된 부분을 주변의 흐름을 따라 자연스럽게 채워나가는 방식입니다. 예를 들어, 물감이 번지는 것을 상상하면, 주변 색이 자연스럽게 퍼져나가 빈 곳을 메우는 것과 유사합니다.
Limitations:
텍스처 복원의 제한: Navier-Stokes 기반 알고리즘은 이미지의 구조적 연속성을 유지하는 데 초점을 맞추고 있어, 복잡한 텍스처나 패턴이 있는 영역을 복원할 때 원본과 일치하는 자연스러운 결과를 보장하기 어렵습니다.
결국 알고리즘 방식은 마스크의 영역이 크거나 주변 픽셀이 복잡할 경우 좋은 결과를 얻기 어렵다는 한계점이 있습니다.
object removal model
Comparer
← 슬라이드하여 비교하기 →
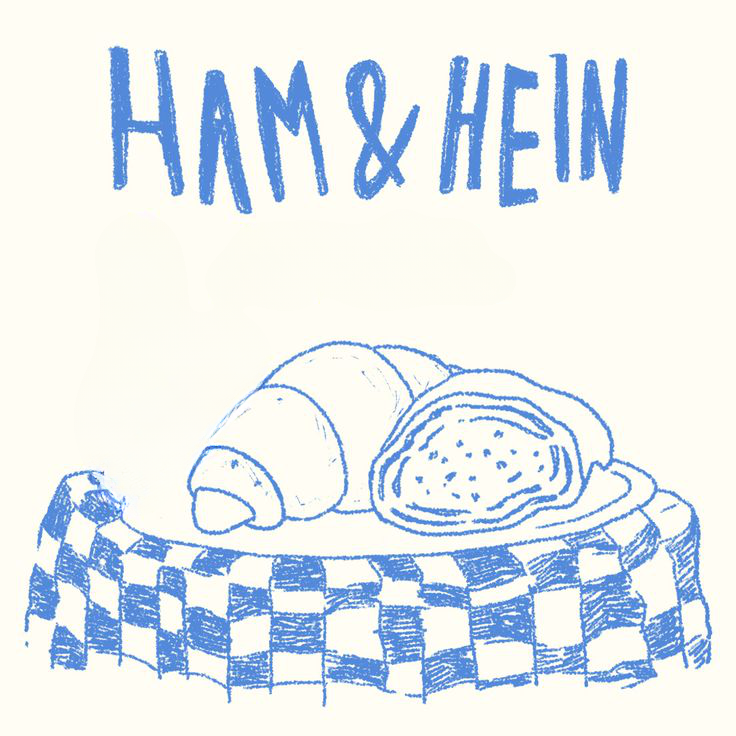
Original Image
lama
현재까지 일반적으로 사용되고 있는 object remove 모델은 lama입니다. 이 모델은 주로 딥 컨볼루션 신경망(Deep Convolutional Neural Networks, DCNN)을 활용하여 이미지 인페인팅(inpainting)을 수행합니다.
Lama의 동작 방식은 다음과 같습니다:
피처 추출(Feature Extraction): 마스킹된 이미지를 DCNN에 입력하여 주변 영역의 특징을 추출합니다. 이는 색상, 질감, 패턴 등 다양한 시각적 정보를 포함합니다.
컨텍스트 이해(Context Understanding): 추출된 특징을 기반으로 이미지의 전체적인 문맥과 구조를 파악합니다. 이를 통해 모델은 제거된 영역에 어떤 내용이 있어야 자연스러운지를 예측합니다.
영역 복원(Region Filling): 모델이 예측한 내용을 토대로 마스킹된 영역을 채웁니다. 이 과정에서 주변 픽셀과의 조화를 고려하여 시각적으로 일관된 결과를 생성합니다.
위 Comparer의 결과 처럼 객체를 제거하는 능력은 뛰어나지만 컨텍스트에 대한 이해도가 약간 떨어지고 약간 blurry한 결과를 보여줍니다.
Inpainting-based approach
Comparer
← 슬라이드하여 비교하기 →
Original Image
flux-fill
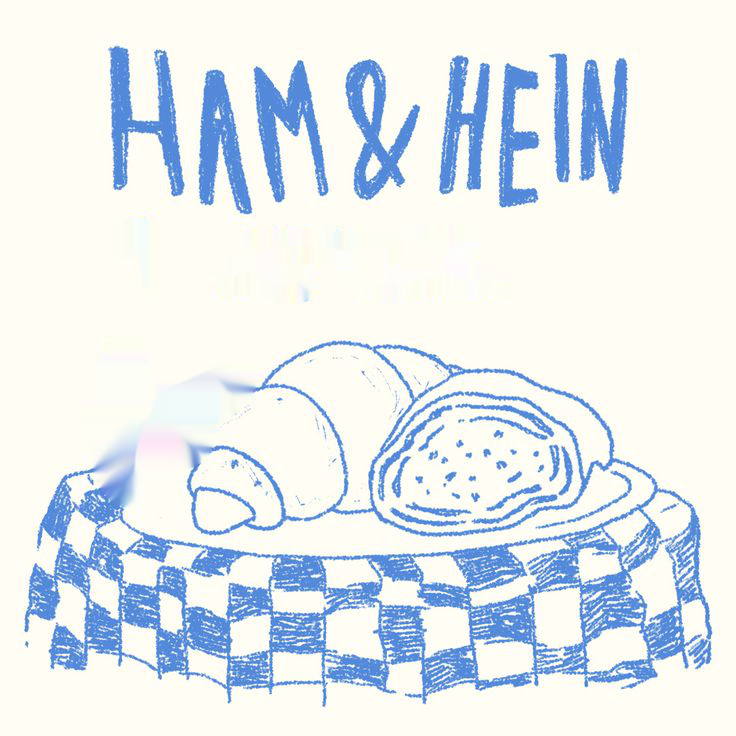
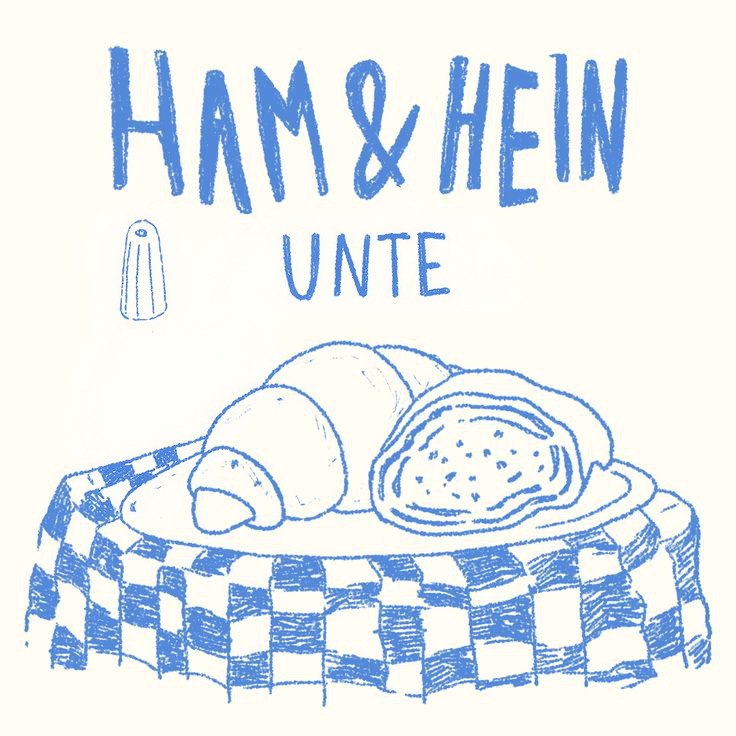
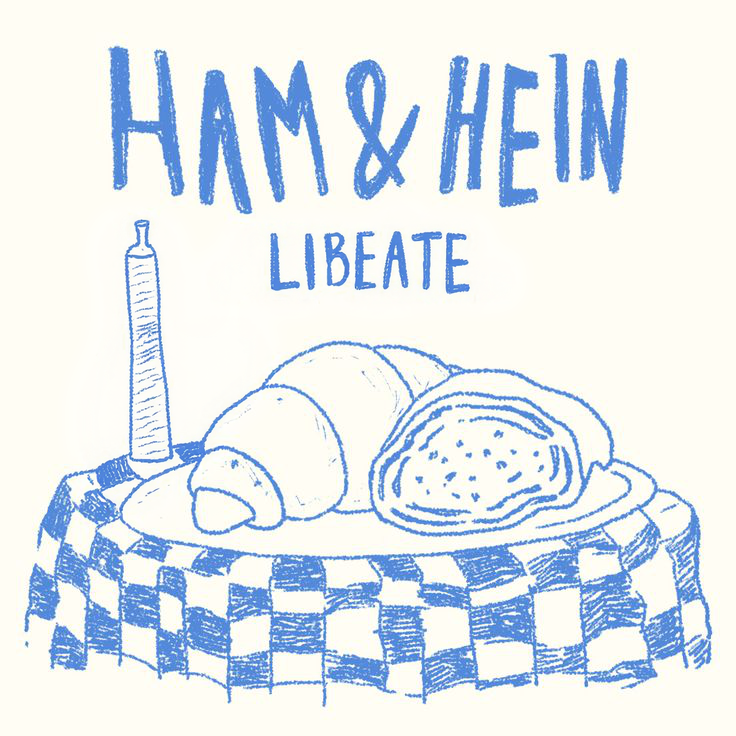
최근 inpainting 및 outpainting에서 가장 좋은 평가를 받고 있는 모델은 flux-fill 모델 입니다. 위 다른 방법들과 flux-fill의 차이점은 프롬프트를 활용한 image-to-image 모델이라는 점 입니다. 마스크 영역을 어떻게 수정할 것인지에 대한 설명이 필요하기 때문에 해당 object를 대신할 배경에 대한 프롬프트를 추가하거나 프롬프트를 비워두면 모델이 알아서 주변 컨텍스트와 어울리도록 수정을 하게 됩니다.
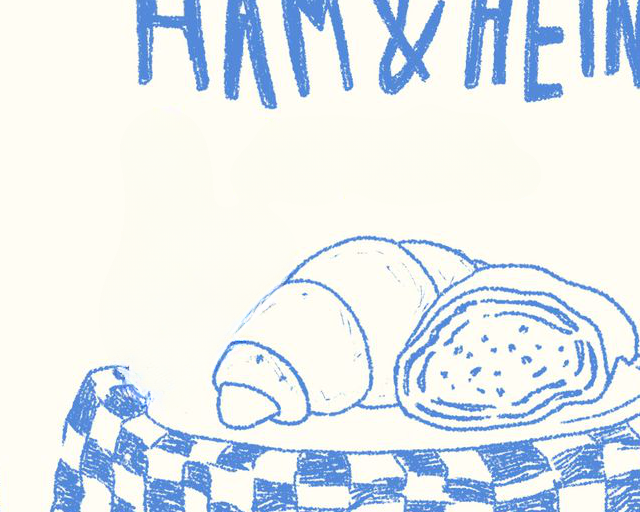
위 Comparer는 프롬프트를 비워 두었을 때의 결과입니다. 기존에 있던 작은 텍스트 영역에 다시 ‘cake’ 이라는 큰 텍스트가 나타나고 와인병 대신 긴 막대가 생성된 것을 확인할 수 있습니다. 모델은 상단의 ‘HAM & HEIN’ 이라는 텍스트와 테이블의 구성을 참고해서 마스크 영역을 이런 식으로 재구성 하였습니다.
다른 seed값을 사용해서 여러번 시도를 했을때 아래와 같은 결과물이 도출되었습니다.
example 1
example 2
example 3
어떤 seed 값에서는 원하는 의도대로 객체가 제거되는 반면 다른 물체가 다시 나타나는 경우도 있습니다. flux-fill의 장점은 주변 context에 대한 스타일, 특징을 마스크 영역에 자연스럽게 반영하지만 일반적으로 마스크 영역을 변형하는것에 초점이 맞추어 학습되었기 때문에 100% 확률로 객체를 제거하지 못한다는 단점이 있습니다.
My Approach
위에서 살펴본 방법들은 퀄리티가 아쉽거나 객체가 다른 객체로 재생성 되는 등 각자의 단점이 있습니다. 하지만 이 방법들을 적절히 조합하여 서로의 단점을 보완할 수 있다면 어떨까요?
예를 들어 flux-fill 모델을 사용할때 객체가 사라지지 않고 다른 객체로 변환될 확률을 lama 모델로 낮추고 lama 모델의 아쉬운 퀄리티를 flux-fill 모델로 보완하는 방법을 생각해 볼 수 있습니다.
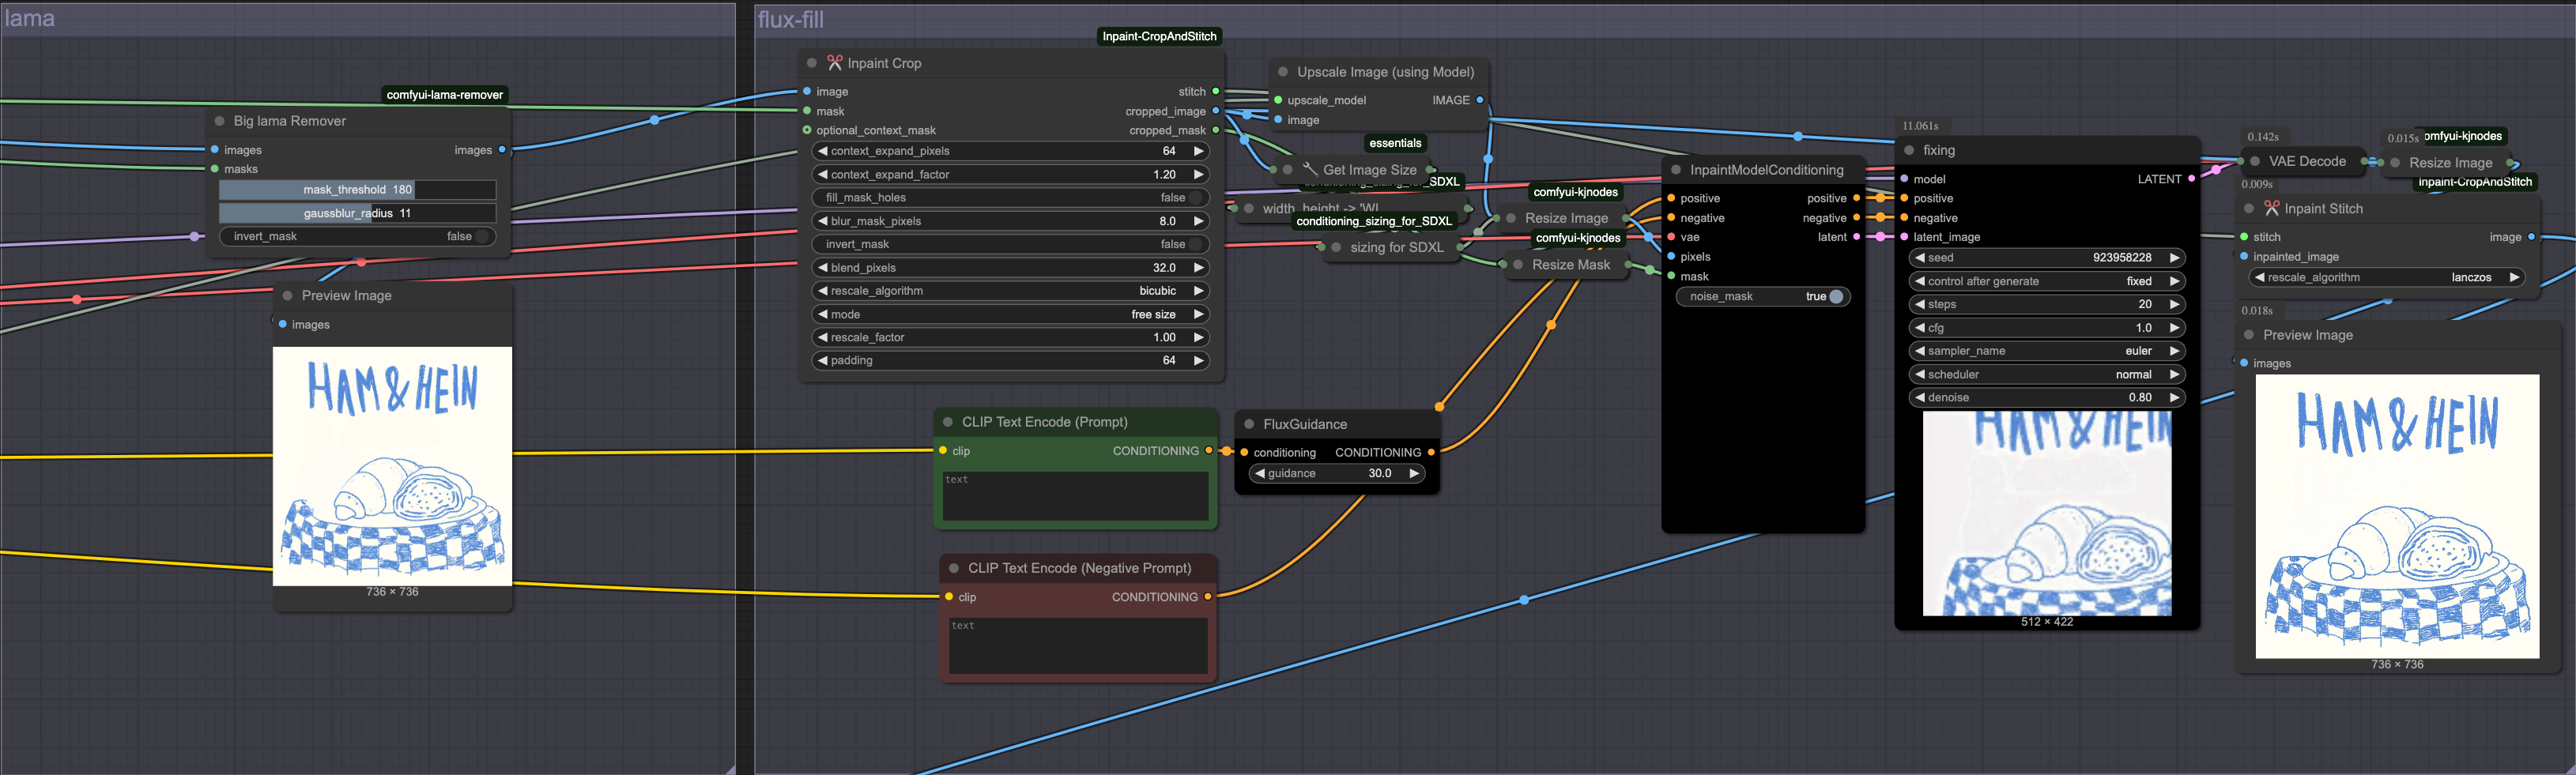
위 예시에 대해 ComfyUI workflow를 구성해 보았습니다. 흐름은 아래와 같습니다.
1. Object Remove
원본 이미지와 마스크를 lama 모델에 입력하여 물체를 확실하게 “제거” 합니다.
original
lama
2. Crop
inpainting과 같은 작업에서는 이미지의 전체적인 context보다 주변 context만 활용할 때 더 좋은 결과를 얻을 수 있습니다. 이미지의 전체 context를 입력하면 복잡하고 많은 양의 정보로 인해 혼동을 줄 수 있기 때문입니다. Inpaint-CropAndStitch 커스텀 노드를 활용하면 마스크의 주변 영역을 crop할 수 있으며 생성 결과를 원본 이미지에 stitch 할 수 있습니다.
위 crop 작업으로 추출된 이미지는 이미지의 일부분이기 때문에 원본 이미지보다 사이즈가 작아집니다. flux-fill 모델에 입력하기 위해 이미지 사이즈를 sdxl 스케일(1024x1024) 수준으로 리사이즈 해야하는데 이 과정에서 이미지의 퀄리티를 최대한 유지하기 위해 upscale 로직을 추가했습니다. (2x-AnimeSharpV2_MoSR_Sharp)
Comparer
← 슬라이드하여 비교하기 →
No Upscale
Upscaled
4. Flux-fill
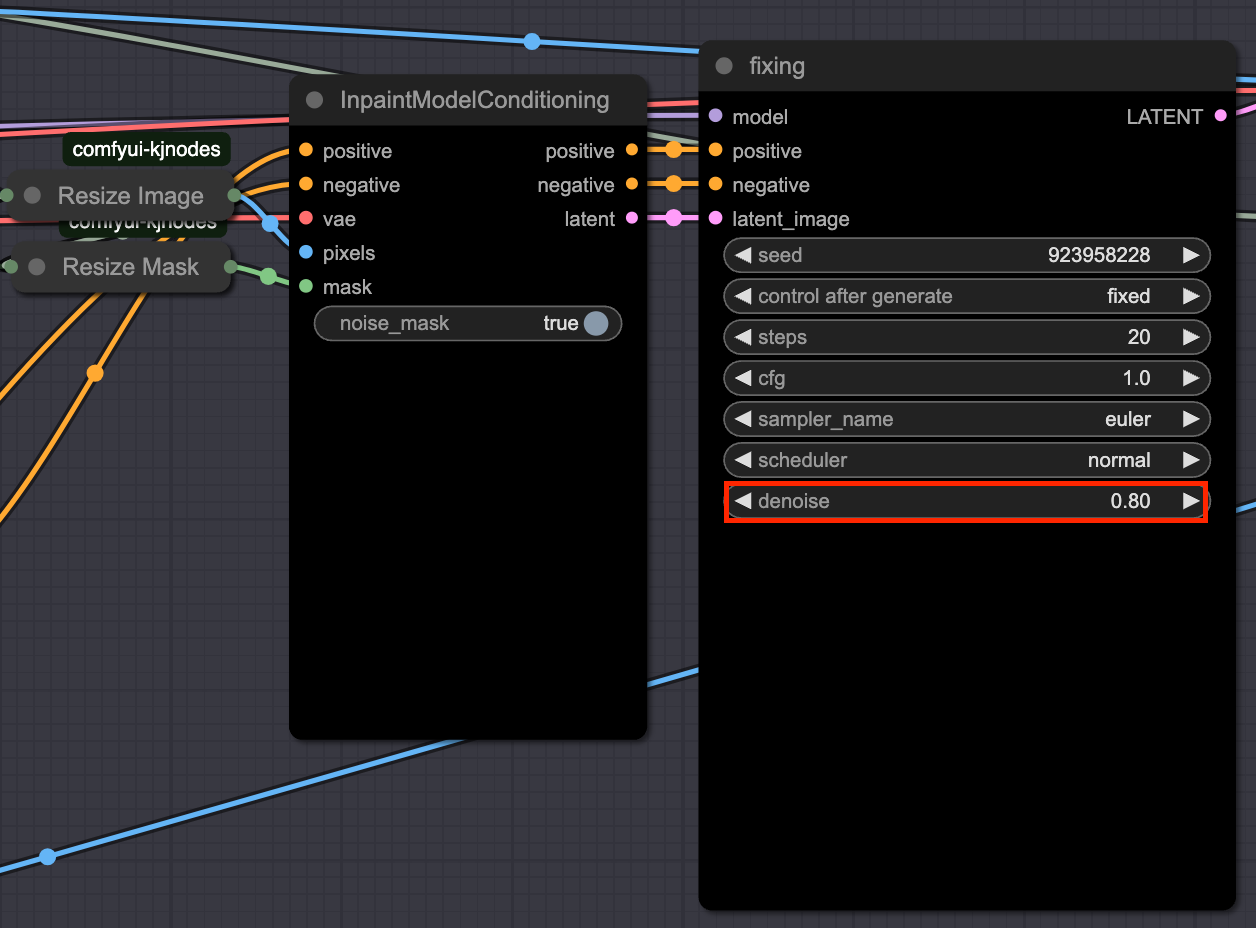
전처리된 이미지와 마스크를 inpaintModelConditioning에 입력하고 flux fill을 수행합니다. 이때 핵심 포인트는 denoise값을 1이 아닌 0.8을 사용하는 것 입니다.
여기서 flux-fill의 역할은 이미 object remove를 수행한 상태에서 이미지를 보정하기 위한 작업입니다. 그렇기 때문에 img2img의 개념으로 denoise값을 낮추어서 다시 이 빈 공간에 객체를 생성하지 못하도록 억제하면서 lama의 결과물을 보정할 수 있습니다.
5. Resize & Stitch
생성돤 결과이미지는 1024x1024 스케일이기 때문에 cropped 크기로 resize합니다.
진행해서 원본 이미지에 결과이미지의 마스크영역을 stitch 합니다.
stitch? : mask영역에 대한 inpaint만 수행하더라도 vae encode-decode 과정에서 mask 바깥 영역의 픽셀값이 미세하게 변동되기 때문에 original 이미지의 퀄리티를 유지하기위해 필요한 작업입니다.
flux-fill output
stitched
6. Result
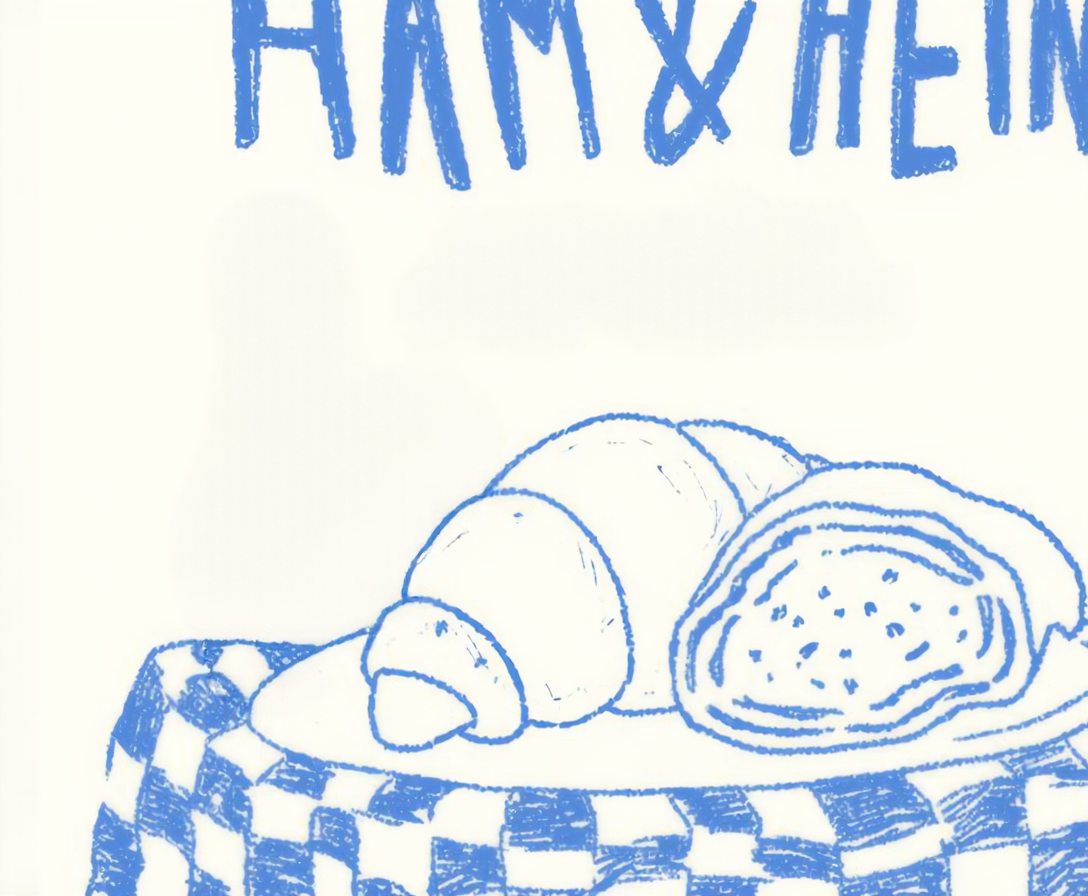
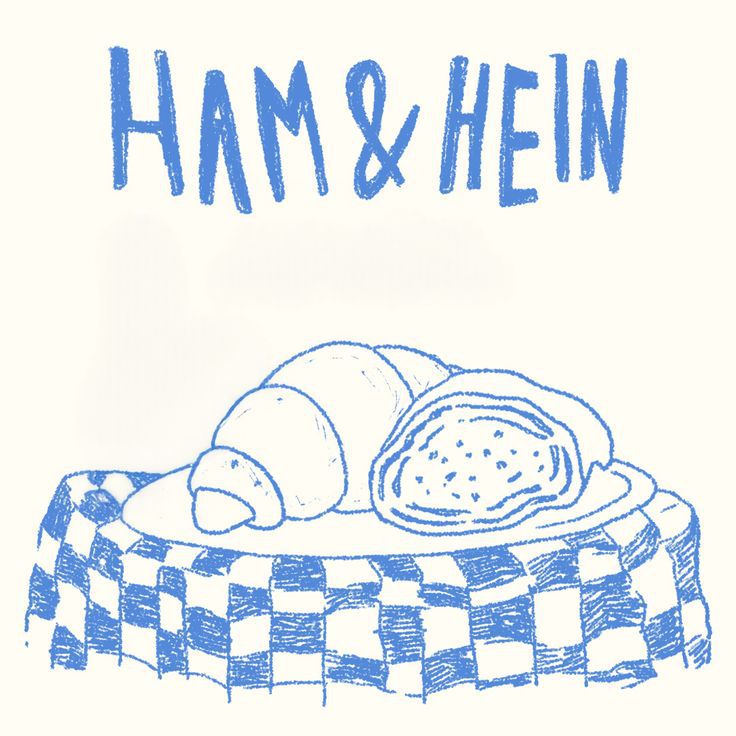
아래 comparer에서 보이는 것 처럼 원하는 물체와 텍스트를 깔끔하게 지워진 것을 확인할 수 있습니다. 다른 이미지에 대한 테스트에서도 마스크 영역에 물체 없이 배경으로만 자연스럽게 채워졌습니다.
Comparer
← 슬라이드하여 비교하기 →
original
result
input
output
input
output
input
output
Conclusion
객체 제거(Object Removal)는 단순히 이미지를 지우는 작업이 아닌, 얼마나 자연스럽게 그 자리를 메우는가에 달려 있습니다. Telea, Navier-Stokes 같은 전통적인 알고리즘 방식부터 lama와 Flux-fill 같은 최신 모델 기반 기법까지 각각의 장단점이 뚜렷하게 존재합니다.
하지만 단일 방식에 의존하기보다는, 각 기법의 강점을 살리고 약점을 보완하는 방식으로 조합하는 것이 가장 효과적인 해법이라는 것을 직접 수많은 실험을 통해 확인할 수 있었습니다.
lama로 정확한 객체 제거를 먼저 수행하고
Crop & Upscale로 모델의 집중도를 높이고
Flux-fill로 자연스럽게 보정하며
Stitch로 원본 이미지의 품질을 유지하는 프로세스
이러한 워크플로우를 통해, 단순한 제거가 아닌 ‘자연스럽게 비워내기’라는 진짜 목적에 더욱 가까워질 수 있었습니다. 이 글이 같은 고민을 하는 분들께 작은 참고가 되었기를 바랍니다.
keep going
Intro
Apple Intelligence has a feature called Clean Up. This feature is a technology that removes certain areas or objects from an image, allowing you to easily erase unwanted parts from the image.
Apple Intelligence Clean Up
However, those who have tried this feature may have experienced that the generated results were different from your intentions or did not work properly.
Personally, while developing an editor that utilizes image generation technology, one of the most challenging features was the object removal technology. Removing objects itself is not very difficult, but filling the removed area with a natural background is more complex than it seems.
Common methods used for object removal are:
Algorithm-based fill
Object removal model
Inpainting-based method
However, each of these three methods has its own limitations. When used individually, it’s difficult to get great results. Yet, if you combine these techniques appropriately, you can improve performance. Through extensive experimentation, I found the best combination and parameters that yield good results most of the time, and I’d like to share them with you.
Limitations
Let’s take a closer look at how each technique works and what limitations it has.
Algorithm-based inpainting
Original Image(+mask)
Telea
Navier-Stokes
1. Telea Algorithm
This method starts filling from the edges of the mask area, referencing the surrounding pixel colors and gradually moving inward. It’s similar to filling in a puzzle piece by looking at the colors and patterns of neighboring pieces.
Limitations:
Difficulty in reproducing complex patterns: Since it only references the color of surrounding pixels, areas with complex patterns or textures may be filled in differently from the original.
Limited restoration for large mask areas: If the mask area is large, it may be challenging to achieve a natural restoration using only the surrounding information.
2. Navier-Stokes Based Algorithm
This method treats changes in the brightness of the image like the flow of a liquid, filling in the damaged area by following the flow of the surroundings. For instance, imagine paint spreading—nearby colors naturally blend and fill the empty space.
Limitations:
Restricted texture restoration: While the Navier-Stokes based algorithm focuses on maintaining structural continuity, it doesn’t guarantee a naturally matched restoration when dealing with areas that have complex textures or patterns.
Ultimately, algorithmic methods struggle to deliver good results when the mask area is large or when the surrounding pixels are complex.
Object removal model
Comparer
← 슬라이드하여 비교하기 →
Original Image
lama
The most commonly used object removal model so far is lama. This model mostly uses Deep Convolutional Neural Networks (DCNN) to perform image inpainting.
The operation of Lama is as follows:
Feature Extraction: It inputs the masked image into the DCNN to extract features from the surrounding area. This includes various visual information such as colors, textures, and patterns.
Context Understanding: Based on the extracted features, it grasps the overall context and structure of the image. Through this, the model predicts what content should be in the removed area to appear natural.
Region Filling: Using the predicted content, it fills the masked area. During this process, it generates visually consistent results by considering the harmony with surrounding pixels.
As shown in the above Comparer, it does an excellent job at removing objects, but it sometimes shows slightly blurry results due to its somewhat limited contextual understanding.
Inpainting-based approach
Comparer
← 슬라이드하여 비교하기 →
Original Image
flux-fill
Flux-fill is currently receiving top ratings for inpainting and outpainting. The difference between flux-fill and the other methods is that it uses prompts. Because you need a description of how to modify the masked area, you can add a prompt about what background should replace that object, or leave the prompt empty to let the model automatically modify the area to blend with the surrounding context.
In the Comparer example above, the prompt was left blank. We can see that the small text area originally said “cake,” but in the result, a large text “cake” reappears, and the wine bottle is replaced by a long stick. The model referred to the upper “HAM & HEIN” text and the overall composition of the table, reconstructing the masked area in such a way.
With different seed values, the following results were produced:
example 1
example 2
example 3
In some seed values, the object was successfully removed as intended, while in other cases, different objects were generated. The advantage of flux-fill is that it naturally reflects the style and features of the surrounding context in the masked area, but because it mainly focuses on modifying the masked area, it does not guarantee a 100% probability of object removal.
My Approach
As we’ve seen, each of these methods has shortcomings: lacking quality, or turning the object into another object, etc. But what if we combine these methods properly to compensate for each other’s weaknesses?
For example, you can first use flux-fill to remove an object but then use lama to reduce the chance that the object is converted into another object—and, conversely, use flux-fill to enhance the quality that lama might lack.
Here’s an example ComfyUI workflow for the process. The flow is as follows:
1. Object Remove
Input the original image and mask into the lama model to ensure the object is “definitively” removed.
original
lama
2. Crop
For inpainting or similar tasks, you can achieve better results by focusing on the context surrounding the masked area rather than the entire image. If you feed the entire image to the model, the complexity and large amount of information may cause confusion. Using the Inpaint-CropAndStitch custom node, you can crop around the mask area and then stitch the generated result back into the original image.
The CropAndStitch node takes the input image and mask, and returns the stitched image, the cropped image, and the cropped mask.
original
cropped
3. Upscale & Resize
The image obtained from the crop step is smaller than the original. Because it must be resized to about SDXL scale (1024x1024) for flux-fill, I added an upscale step to maintain as much quality as possible during resizing (2x-AnimeSharpV2_MoSR_Sharp).
Comparer
← 슬라이드하여 비교하기 →
No Upscale
Upscaled
4. Flux-fill
Input the preprocessed image and mask into the inpaintModelConditioning and perform flux-fill. The key point here is to use a denoise value of 0.8 instead of 1.
The role of flux-fill here is to “refine” the image after the object has already been removed. Therefore, use it like img2img with a lower denoise value so that a new object isn’t generated again in the empty space, while correcting the outcome from lama.
5. Resize & Stitch
The generated output image is at 1024x1024 scale, so resize it back to the cropped size.
Then stitch the resulting image’s mask area into the original image.
Stitch? : Even if you do an inpaint of only the masked area, the vae encode-decode process may slightly alter the pixels outside the mask area. Stitching is therefore necessary to preserve the original image’s quality.
flux-fill output
stitched
6. Result
As seen in the comparer below, the objects and text are neatly removed as intended. In tests with other images, the masked area was filled only with the background without reintroducing objects, and it was done quite naturally.
Comparer
← 슬라이드하여 비교하기 →
original
result
input
output
input
output
input
output
Conclusion
Object Removal is not simply about erasing parts of an image, but how naturally the space is filled back in. From algorithmic approaches like Telea or Navier-Stokes to modern model-based techniques like lama and Flux-fill, each has its own clear pros and cons.
However, rather than relying on a single approach, I confirmed through numerous experiments that it is most effective to combine each method in a way that leverages its strengths and compensates for its weaknesses.
Precisely remove objects first using lama
Crop & Upscale to focus the model’s attention
Refine with Flux-fill
Use Stitch to preserve the original image’s quality
By using this workflow, we can get closer to the real goal of “naturally emptying out” rather than just removing objects. I hope this post serves as a small reference for those struggling with similar challenges.


Leave a comment