[논문리뷰] EfficientNet
이번 포스팅에서는 Google Brain에서 2019년에 발표한 EfficientNet: Rethinking Model Scaling for Convolutional Neural Networks(Image Classfication) 논문에 대해 리뷰하려고 한다.
1. Introduction
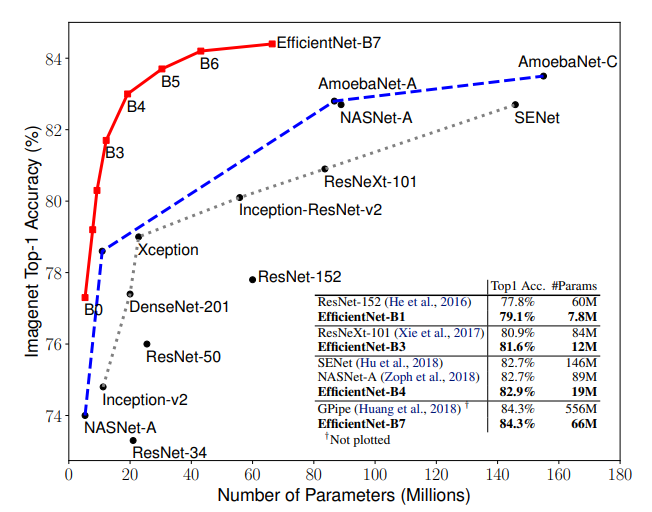
본 논문에서는 어떻게 Network를 확장해야 효율적일지에 대한 연구가 진행되었고 그 결과 기존 Network보다 파라미터 대비 정확도가 높은 효율적인 Network를 제시하였으며 효율적인 Network라는 이름을 본따 EfficientNet으로 정하였다. 위 사진을 보면 EfficientNet이 SOTA image classification network보다 효율적인 모델임을 알 수 있다.(B0~B7는 모델 사이즈를 의미)
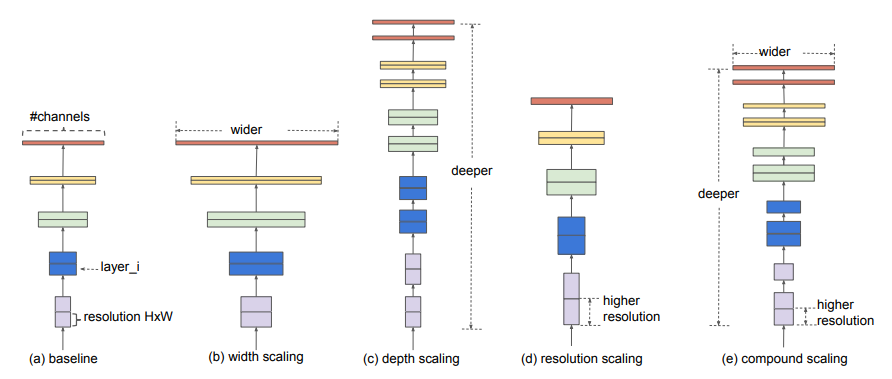
저자들은 기존에 모델을 Scaleing up하려고 시도를 했던 Network들은 위 그림과 같이 Channel(Width)을 늘리거나 Layer(Depth)를 많이 쌓거나 혹은 Input size(Resolution)을 키우는 방식을 따로 1개씩만 적용을 했다는 것에 대해 의문점을 가졌고 이 세가지 방법을 잘 종합하며 모델을 확장시키는 방법을 제시하였다. 그 방법을 논문에서는 Compound Scaling이라고 하고있다.
2. Compound Model Scaling
Depth (d): Network가 깊어지게되면 좀 더 풍부하고 복잡한 특징을 추출할 수 있고 다른 task에 일반화하기 좋지만 vanishing gradient problem이 생기게 된다. 이를 해결하기위해 ResNet의 skip connection, batch normalization 등 다양한 방법들이 있지만 그렇다 하더라도 너무 깊은 Layer를 가진 모델의 성능은 더 좋아지지 않는다. (ResNet101 과 ResNet1000의 정확도가 비슷한 것 처럼.)
Width (w): 보통 Width(Channel)는 작은 모델을 만들기 위헤 scale down(MobileNet 등)을 하는데에 사용되었지만 더 넓은 channel은 더 세밀한 특징을 추출할 수 있고 train하기가 더 쉽다. width의 증가에 따른 성능은 빠르게 saturate되는 현상이 있다.
Resolution (r): 높은 해상도의 이미지를 input으로 사용할때 모델은 더욱 세밀한 패턴을 학습할 수 있기 때문에 성능을 높이기 위해서 Resolution을 크게 가져가고 있으며 최근에는 480x480(GPipe) 600x600(object detection)의 size를 사용하고 있다. 하지만 마찬가지로 너무 큰 해상도는 효율적이지 않다.

위 그래프는 각각 width, depth, resolution을 키웠을 때의 FLOPS(Floating point Operation Per Second)와 Accuracy를 보여준다. width, depth, resolution 모두 80% accuracy까지만 빠르게 saturate(포화)되고 그 이후로의 성능향상은 한계가 있을을 알 수 있다.
그래서 저자들은 width, depth, resolution를 조합하는 Compound Scaling을 아래와 같이 진행하였다.
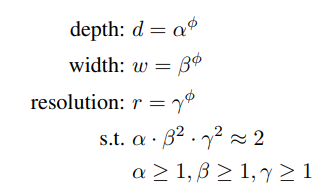
- 먼저 depth를 α, width를 β, resolution을 γ로 만들고 ϕ=1 일때의 α x β^2 x γ^2 ≈ 2를 만족하는 α, β, γ를 grid search를 통해 찾는다. (논문에서 찾은 값은 α=1.2, β=1.1, γ=1.15 이다.)
- 여기서 width와 resolution에 제곱항이 있는 이유는 depth(Layer)가 2배 증가하면 FLOPS는 2배가 되지만 width와 resolution은 그렇지 않기 때문이다.
- width는 이전 레이어의 출력, 현재 레이어의 입력 이렇게 두곳에서 연산이 이루어 지므로 width가 2배가 되면 4배의 FLOPS가 되고 resolution은 가로 x세로 이기 때문에 당연히 resolution이 2배가 되면 4배의 FLOPS가 된다.
- grid search를 통해 α, β, γ를 찾았다면 ϕ(0, 0.5, 1, 2, 3, 4, 5, 6)를 사용해 최종적으로 기존 width, depth, resolution에 곱할 factor를 만들게 된다.(파이의 변화로 B0~B7까지의 모델을 설계하였음)
3. EfficientNet Architecture
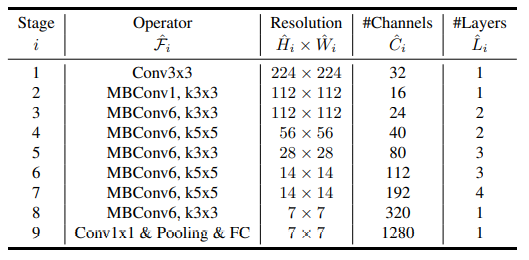
- 위 그림은 scaling을 하지 않은 기본 B0모델 구조이다. Operator의 MBConv는 Mobilenet v2에서 제안된 inverted residual block을 의미하고 바로 옆에 1 혹은 6은 expand ratio이다.
- 이 논문도 마찬가지로 ImageNet dataset의 size인 224x224를 input size로 사용하였다.
-
Activation function으로 ReLU가 아닌 Swish(혹은 SiLU(Sigmoid Linear Unit))를 사용하였다. Swish 는 매우 깊은 신경망에서 ReLU 보다 높은 정확도를 달성한다고 한다.
- squeeze-and-excitation optimization을 추가하였다.

여기서 squeeze-and-excitation에 대해 간단히 설명하자면 위 그림처럼 Squeeze 즉 pooling을 통해 1x1 size로 줄여서 정보를 압축한 뒤에 excitation 즉 압축된 정보들을 weighted layer와 비선형 activation function으로 각 채널별 중요도를 계산하여 기존 input에 곱을 해주는 방식을 말한다.
SENet 논문 : arxiv.org/abs/1709.01507
4. Experiments
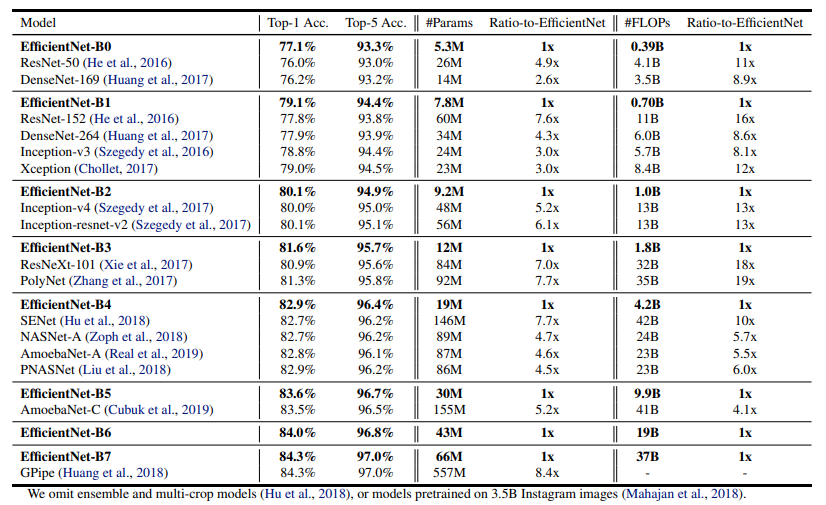
위 차트는 ImageNet dataset에 대한 성능 지표이고 EfficientNet의 B0~B7 까지 각각의 성능과 비슷한 SOTA모델을과 비교를 하고 있다. 같은 성능 대비 파라미터와 FLOPS가 EfficentNet 모델들이 압도적으로 적은 것을 볼 수 있다.

위 그림은 width, height, resolution을 각각 따로 scaling up 했을때와 compund scaling 했을때의 Class Activation Map을 나타낸 사진이다. compound scaling이 각각의 객체들을 잘 담고 있으며 좀더 정확한 것을 볼 수 있다.
이외 굉장히 다양한 실험을 진행하였는데 직접 논문을 찾아보면 좋을 것 같다.
Pytorch 모델 구현
import torch
import torch.nn as nn
from math import ceil
import pdb
from torchsummary import summary

base_model = [
    # expand_ratio, channels, repeats, stride, kernel_size
    [1, 16, 1, 1, 3],
    [6, 24, 2, 2, 3],
    [6, 40, 2, 2, 5],
    [6, 80, 3, 2, 3],
    [6, 112, 3, 1, 5],
    [6, 192, 4, 2, 5],
    [6, 320, 1, 1, 3],
]

phi_values = {
    # tuple of: (phi_value, resolution, drop_rate)
    'b0': (0, 224, 0.2),  # alpha, beta, gamma, depth = alpha ** phi
    'b1': (0.5, 240, 0.2),
    'b2': (1, 260, 0.3),
    'b3': (2, 300, 0.3),
    'b4': (3, 380, 0.4),
    'b5': (4, 456, 0.4),
    'b6': (5, 528, 0.5),
    'b7': (6, 600, 0.5),
}
class CNNBlock(nn.Module):
    def __init__(self, in_channels, out_channels, kernel_size, stride, padding, groups=1):
        super(CNNBlock, self).__init__()
        self.cnn = nn.Conv2d(
            in_channels,
            out_channels,
            kernel_size,
            stride,
            padding,
            groups=groups,  # groups=1이면 일반적인 Conv, groups=in_channels 일때만 Depthwise Conv 수행
            bias=False
        )
        self.bn = nn.BatchNorm2d(out_channels)
        self.silu = nn.SiLU()  # SiLU <-> Swish

    def forward(self, x):
        return self.silu(self.bn(self.cnn(x)))
class SqueezeExcitation(nn.Module):
    def __init__(self, in_channels, reduced_dim):
        super(SqueezeExcitation, self).__init__()
        self.se = nn.Sequential(
            nn.AdaptiveAvgPool2d(1),  # C x H x W -> C x 1 x 1
            nn.Conv2d(in_channels, reduced_dim, 1),
            nn.SiLU(),
            nn.Conv2d(reduced_dim, in_channels, 1),
            nn.Sigmoid(),  # 각 채널에 대한 score (0~1)
        )

    def forward(self, x):
        return x * self.se(x)  # input channel x 채널의 중요도
class InvertedResidualBlock(nn.Module):
    def __init__(
            self,
            in_channels,
            out_channels,
            kernel_size,
            stride,
            padding,
            expand_ratio,
            reduction=4,  # squeeze excitation
            survival_prob=0.8,  # for stochastic depth
    ):
        super(InvertedResidualBlock, self).__init__()
        self.survival_prob = survival_prob
        self.use_residual = in_channels == out_channels and stride == 1
        hidden_dim = in_channels * expand_ratio
        self.expand = in_channels != hidden_dim
        reduced_dim = int(in_channels / reduction)

        if self.expand:
            self.expand_conv = CNNBlock(
                in_channels, hidden_dim, kernel_size=3, stride=1, padding=1,
            )

        self.conv = nn.Sequential(
            CNNBlock(
                hidden_dim, hidden_dim, kernel_size, stride, padding, groups=hidden_dim,  # Depthwise Conv
            ),
            SqueezeExcitation(hidden_dim, reduced_dim),
            nn.Conv2d(hidden_dim, out_channels, 1, bias=False),  # point wise conv
            nn.BatchNorm2d(out_channels),
        )

    def stochastic_depth(self, x):
        '''
        vanishing gradient로 인해 학습이 느리게 되는 문제를 완화시키고자 stochastic depth 라는 randomness에 기반한 학습 방법
        Stochastic depth란 network의 depth를 학습 단계에 random하게 줄이는 것을 의미
        복잡하고 큰 데이터 셋에서는 별다를 효과를 보지는 못한다고 함
        '''
        if not self.training:
            return x

        binary_tensor = torch.rand(x.shape[0], 1, 1, 1, device=x.device) < self.survival_prob
        return torch.div(x, self.survival_prob) * binary_tensor  # torch.div으로 감싼 연산은 stochastic_depth 논문에 나와있음.

    def forward(self, inputs):
        x = self.expand_conv(inputs) if self.expand else inputs

        if self.use_residual:
            return self.stochastic_depth(self.conv(x)) + inputs
        else:
            return self.conv(x)
class EfficientNet(nn.Module):
    def __init__(self, version, num_classes):
        super(EfficientNet, self).__init__()
        width_factor, depth_factor, dropout_rate = self.calculate_factors(version)
        last_channels = ceil(1280 * width_factor)
        self.features = self.create_features(width_factor, depth_factor, last_channels)
        self.pool = nn.AdaptiveAvgPool2d(1)  # stage9 pool
        self.classifier = nn.Sequential(  # stage9 FC
            nn.Dropout(dropout_rate),
            nn.Linear(last_channels, num_classes),
        )

    def calculate_factors(self, version, alpha=1.2, beta=1.1):
        phi, res, drop_rate = phi_values[version]
        depth_factor = alpha ** phi
        width_factor = beta ** phi
        return width_factor, depth_factor, drop_rate

    def create_features(self, width_factor, depth_factor, last_channels):
        channels = int(32 * width_factor)  # B0의 32는 첫레이어의 channel
        features = [CNNBlock(3, channels, 3, stride=2, padding=1)]  # stage 1
        in_channels = channels

        for expand_ratio, channels, repeats, stride, kernel_size in base_model:
            out_channels = 4 * ceil(int(channels*width_factor) / 4)  # SqueezeExcitation reduction에서 4로 잘 나눠지도록 처리
            # pdb.set_trace()
            layers_repeats = ceil(repeats * depth_factor)

            for layer in range(layers_repeats):  # stage 2~8
                features.append(
                    InvertedResidualBlock(
                        in_channels,
                        out_channels,
                        kernel_size=kernel_size,
                        stride=stride if layer == 0 else 1,
                        padding=kernel_size // 2,  # if k=1:pad=0, k=3:pad=1, k=5:pad=2
                        expand_ratio=expand_ratio
                    )
                )
                in_channels = out_channels


        features.append(
            CNNBlock(in_channels, last_channels, kernel_size=1, stride=1, padding=0)  # stage9 Conv 1x1
        )

        return nn.Sequential(*features)

    def forward(self, x):
        x = self.pool(self.features(x))
        return self.classifier(x.view(x.shape[0], -1))  # flatten
if __name__ == '__main__':

    device = 'cuda' if torch.cuda.is_available() else 'cpu'
    version = 'b0'
    phi, res, drop_rate = phi_values[version]
    batch_size, num_classes = 4, 10
    x = torch.randn((batch_size, 3, res, res)).to(device)
    model = EfficientNet(
        version=version,
        num_classes=num_classes,
    ).to(device)

    print(model(x).shape)
    summary(model, input_size=(3, 224, 224))
간단히 모델을 Test하기 위해 (4, 3, 224, 224) randn tensor를 생성하여 모델의 출력 Size를 확인 하면 torch.Size([4, 10])으로 잘 나오는 것을 볼 수 있다. (torchsummary를 통해 output shape과 parameter수를 확인 할 수 있다.)
End
본 논문은 새로운 Architecture로 적은 파라미터 수로 좋은 성능을 낸 모델을 제시한 것이 아니라 기존의 모델들의 성능을 좀 더 효율적으로 scaling up 시키기 위해 Compound Scale을 제안하였다. 저자들은 후속으로 Object Detection task에도 이 아이디어를 적용한 EfficientDet 논문발표를 하였는데 다음에 리뷰를 할 예정이다.
+ EfficientNet B0 모델을 CIFAR-10 데이터셋으로 100 epoch으로 학습시켜 보았는데 정확도가 85%까지밖에 나오지 못했다. 하이퍼 파라미터를 좀 더 잘 만져서 적용시켜봐야 할 것같다. Keep Going..
Reference

Leave a comment