
[Part.3] Image Classification on MLOps
Content
1. Define Persistent Volume Claim
2. Kubeflow Pipeline
3. Preprocessing
4. Hyperparameter Tuning (weights and biases)
5. Model Training & Test (kfp)
6. Model Versioning (mlflow)
7. Model Serving (bentoml)
8. Monitoring (prometheus & grafana)
지난 포스팅에서 전처리, 하이퍼파라미터 튜닝, 학습 및 평가를 수행해 보았다. 이제 mlflow의 Experiments를 Model Versioning을 해보고 원하는 모델을 직접 Serving을 할 차례이다. 마지막으로는 Kubernetes의 리소스 관리를 위한 Monitoring도 짧게 다룰 예정이다.
6. Model Versioning
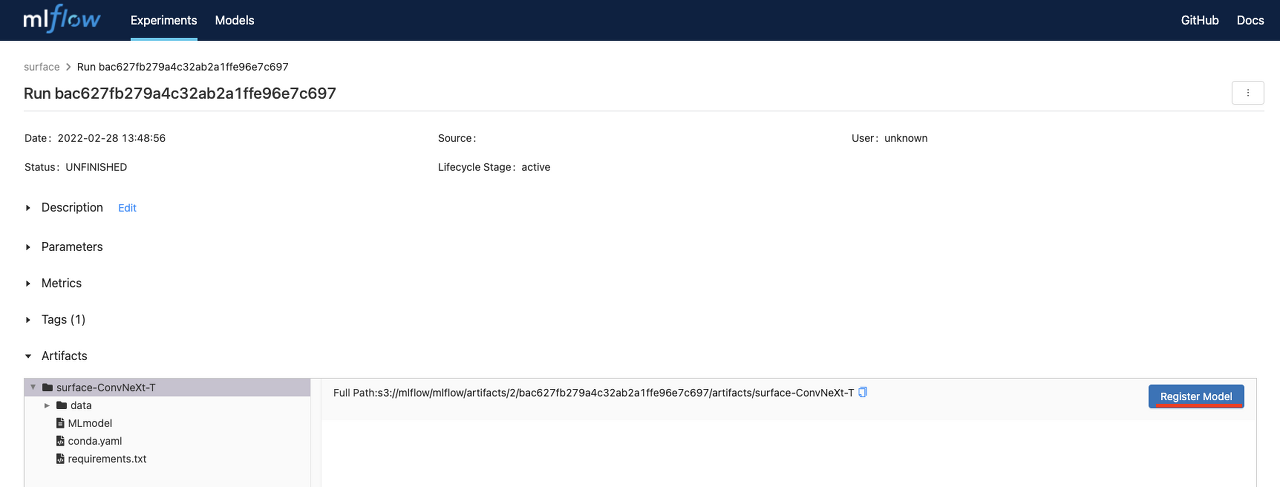
위 그림은 이전에 실행한 Experiment의 run을 클릭했을 때 나오는 화면이다. 아직은 모델이 버전으로 관리되어있는 상태가 아닌 단순히 하나의 run으로 저장이 되어있다. 여기서 artifact의 root폴더를 클릭하게 되면 우측의 Register Model 버튼이 생기는데 이를 클릭하면 아래 화면이 나오게 된다.
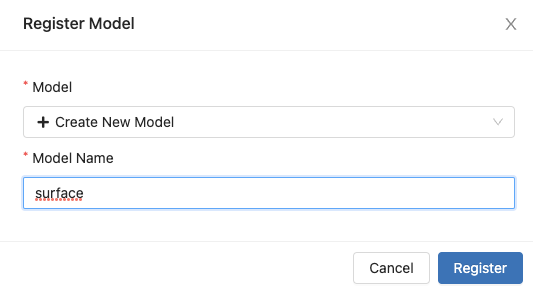
이전에 저장된 모델 name이 없다면 새로운 이름으로 모델을 정의할 수 있다. 이제 이 프로젝트에서 다루는 모델은 surface라는 이름으로 Versioning 할 수 있다.
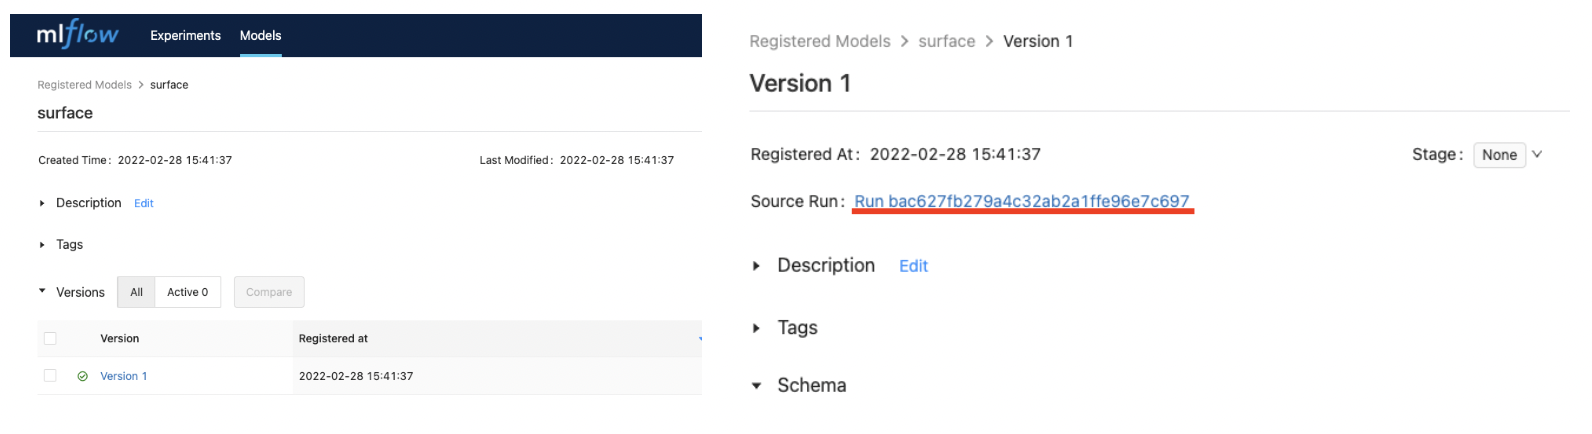
Models 메뉴로 들어가서 생성된 surface 모델을 클릭하면 좌측 그림과 같은 화면이 나오게 되며 이로서 이전에 실행된 Experiments가 하나의 버전으로 관리가 되는 것이다. Version 1을 클릭하면 우측 그림에 보이는 것 처럼 해당 Version의 Experiments run id를 확인할 수 있다.
7. Model Serving
Model Serving을 공부하면서 Seldon-core, KFServing 둘다 사용을 해 보았지만 Seldon-core는 Pytorch에 대한 한계, KFServing은 불안한 버전 등의 이슈로 bentoML이라는 Serving Framework를 이번 프로젝트의 Model Serving에 활용하였다. (BentoML의 설치방법 및 자세한 정보는 여기를 참고)
bentoML은 파이썬 스크립트로 쉽게 작성할 수 있으며 파이썬 API 서빙은 물론 쿠버네티스에서 서빙도 가능하기 때문에 요즘 각광받는 추세이다. (+ Flask기반 모델보다 100배 빠른 처리속도를 보여준다고 한다)
bento_service.py
import torch
import torch.nn.functional as F
from bentoml import env, artifacts, api, BentoService
from bentoml.adapters import ImageInput
from bentoml.frameworks.pytorch import PytorchModelArtifact

SURFACE_CLASSES = ['negatieve', 'positive']
@env(infer_pip_packages=True, pip_packages=['torch','pillow','numpy'])
@artifacts([PytorchModelArtifact('pytorch_model')])
class SurfaceClassification(BentoService):
    @api(input=ImageInput(), batch=True)
    def predict(self, imgs):  # imgs = [b, w, h, c], list
        imgs = torch.tensor(imgs).permute(0, 3, 1, 2)
        imgs = F.interpolate(imgs, size=224) / 255.0
        outputs = self.artifacts.pytorch_model(imgs)

        return torch.argmax(outputs, dim=1).tolist()
- bentoml은 다양한 ML 프레임워크를 지원하며 현재모델은 Pytorch로 이루어져 있으므로 PytorchModelArtifact를 사용하였다.
- bentoml은 Adaptive Micro Batch라는 기능을 지원하며 이는 @api 데코레이션에 파라미터로 배치 최대 메모리 및 지연 제한 시간 설정을 할 수있다. 여기서는 batch=True로 설정해 두었다.
- predict 함수의 imgs 인자는 [b, w, h, c]차원의 리스트이며 함수 내에 일반적인 Pytorch 모델 전처리과정을 적어주었다. 위와같이 작성하면 모델은 0혹은 1로 예측값을 내보낸다.
mlflow_model.py
import torch
import os
import mlflow
from mlflow.tracking import MlflowClient

def load_model(model_name, version):
    os.environ["AWS_ACCESS_KEY_ID"] = "minio"
    os.environ["AWS_SECRET_ACCESS_KEY"] = "minio123"
    os.environ["MLFLOW_S3_ENDPOINT_URL"] = "MiniO Node Port"
    client = MlflowClient("MLflow Node Port")

    filter_string = "name='{}'".format(model_name)
    results = client.search_model_versions(filter_string)  # 버전별로 묶여나옴

    for res in results:
        if res.version == str(version):
            model_uri = res.source
            break

    reconstructed_model = mlflow.pytorch.load_model(model_uri)
    return reconstructed_model
- bentoml은 클라이언트에서 진행되기 때문에 minio와 mlflow 접속을 위한 url을 kubeflow pipeline처럼 dns lookup을 하지 못하기 때문에 Node Port주소를 적어주었다.
- load_model 함수의 파라미터는 mlflow에서 가져올 모델이름과 버전을 받는다.
bento_packer.py
from bento_service import SurfaceClassification
from mlflow_model import load_model

# Create a classification service instance
surface_classifier_service = SurfaceClassification()
model = load_model(model_name='surface', version=1)

# Pack the newly trained model artifact
surface_classifier_service.pack('pytorch_model', model)

# Save the prediction service to disk for model serving
saved_path = surface_classifier_service.save()
- model을 위에서 생성한 surface 모델의 버전1로 선택하였다.
- 9번째 줄에 ‘pytorch_model’은 위의 bento_service.py의 @artifacts 데코레이션의 이름과 동일해야 한다.
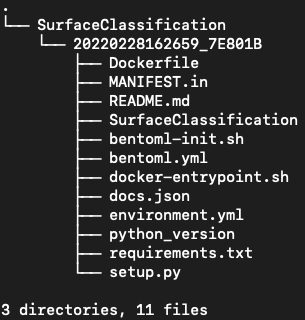
- 위 파일을 실행하면 root/bentoml/repository 경로에 아래 구조로 파일이 자동 생성된다.
이중에서 우리가 필요한 파일은 Dockerfile이며 Dockerfile을 push하여 쿠버네티스 서비스 manifest 작성시에 push한 이미지를 적어주기만 하면 Model Serving이 작동하게 된다. Dockerfile은 아래와 같이 작성된다.
Dockerfile
FROM bentoml/model-server:0.13.1-py37

# Configure PIP install arguments, e.g. --index-url, --trusted-url, --extra-index-url
ARG EXTRA_PIP_INSTALL_ARGS=
ENV EXTRA_PIP_INSTALL_ARGS $EXTRA_PIP_INSTALL_ARGS

ARG UID=1034
ARG GID=1034
RUN groupadd -g $GID -o bentoml && useradd -m -u $UID -g $GID -o -r bentoml

ARG BUNDLE_PATH=/home/bentoml/bundle
ENV BUNDLE_PATH=$BUNDLE_PATH
ENV BENTOML_HOME=/home/bentoml/

RUN mkdir $BUNDLE_PATH && chown bentoml:bentoml $BUNDLE_PATH -R
WORKDIR $BUNDLE_PATH

# copy over the init script; copy over entrypoint scripts
COPY --chown=bentoml:bentoml bentoml-init.sh docker-entrypoint.sh ./
RUN chmod +x ./bentoml-init.sh

# Copy docker-entrypoint.sh again, because setup.sh might not exist. This prevent COPY command from failing.
COPY --chown=bentoml:bentoml docker-entrypoint.sh setup.s[h] ./
RUN ./bentoml-init.sh custom_setup

COPY --chown=bentoml:bentoml docker-entrypoint.sh python_versio[n] ./
RUN ./bentoml-init.sh ensure_python

COPY --chown=bentoml:bentoml environment.yml ./
RUN ./bentoml-init.sh restore_conda_env

COPY --chown=bentoml:bentoml requirements.txt ./
RUN ./bentoml-init.sh install_pip_packages

COPY --chown=bentoml:bentoml docker-entrypoint.sh bundled_pip_dependencie[s]  ./bundled_pip_dependencies/
RUN rm ./bundled_pip_dependencies/docker-entrypoint.sh && ./bentoml-init.sh install_bundled_pip_packages

# copy over model files
COPY --chown=bentoml:bentoml . ./

# Default port for BentoML Service
EXPOSE 5000

USER bentoml
RUN chmod +x ./docker-entrypoint.sh
ENTRYPOINT [ "./docker-entrypoint.sh" ]
CMD ["bentoml", "serve-gunicorn", "./"]
cd bentoml/repository/SurfaceClassification/20220228162659_7E801B

docker build -t {your account}/bentoml-surface-serving:v0.1 .
docker push {your account}/bentoml-surface-serving:v0.1
Service Manifest 작성
surface-classifier.yaml
apiVersion: v1
kind: Service
metadata:
  labels:
    app: surface-classifier
  name: surface-classifier
spec:
  ports:
  - name: predict
    port: 5000
    targetPort: 5000
  selector:
    app: surface-classifier
  type: NodePort

---
apiVersion: apps/v1
kind: Deployment
metadata:
  labels:
    app: surface-classifier
  name: surface-classifier
spec:
  selector:
    matchLabels:
      app: surface-classifier
  template:
    metadata:
      labels:
        app: surface-classifier
    spec:
      containers:
      - image: {your account}/bentoml-surface-serving:v0.1
        name: surface-classifier
        ports:
        - containerPort: 5000
kubectl apply -f surface-classifier.yaml -n kubeflow-user-example-com
kubectl get svc/surface-classifier -n kubeflow-user-example-com

# NAME                 TYPE       CLUSTER-IP       EXTERNAL-IP   PORT(S)          AGE
# surface-classifier   NodePort   {x.x.x.x}        <none>        5000:{xxx}/TCP   114s
이제 모델이 kubeflow-user-example-com 네임스페이스에 배포되었다. Node Port로 IP를 열었고 해당 주소로 request를 보내거나 직접 접속해 Swagger UI에서 inference를 진행할 수 있다. IP주소에 접속하면 아래 그림과 같이 나오게 되고 우측에 Try it out 버튼을 클릭해 inference를 진행할 수 있다.
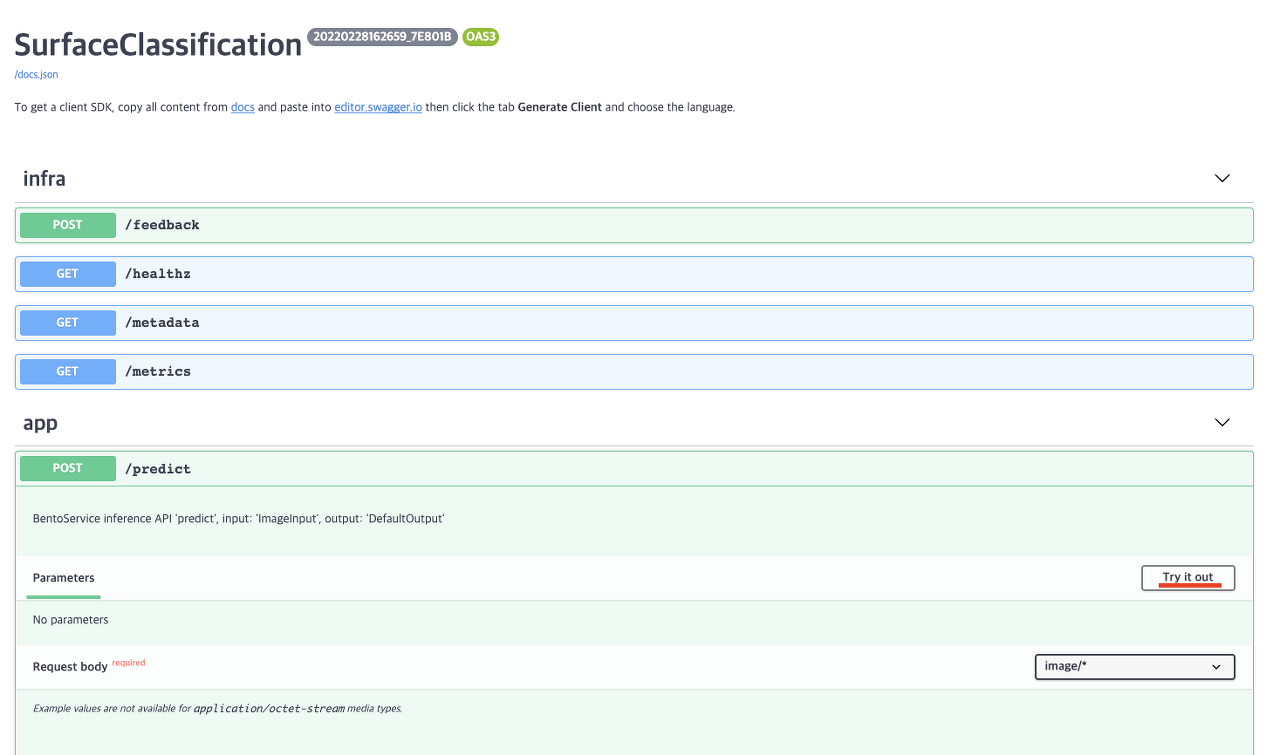
Input

Output
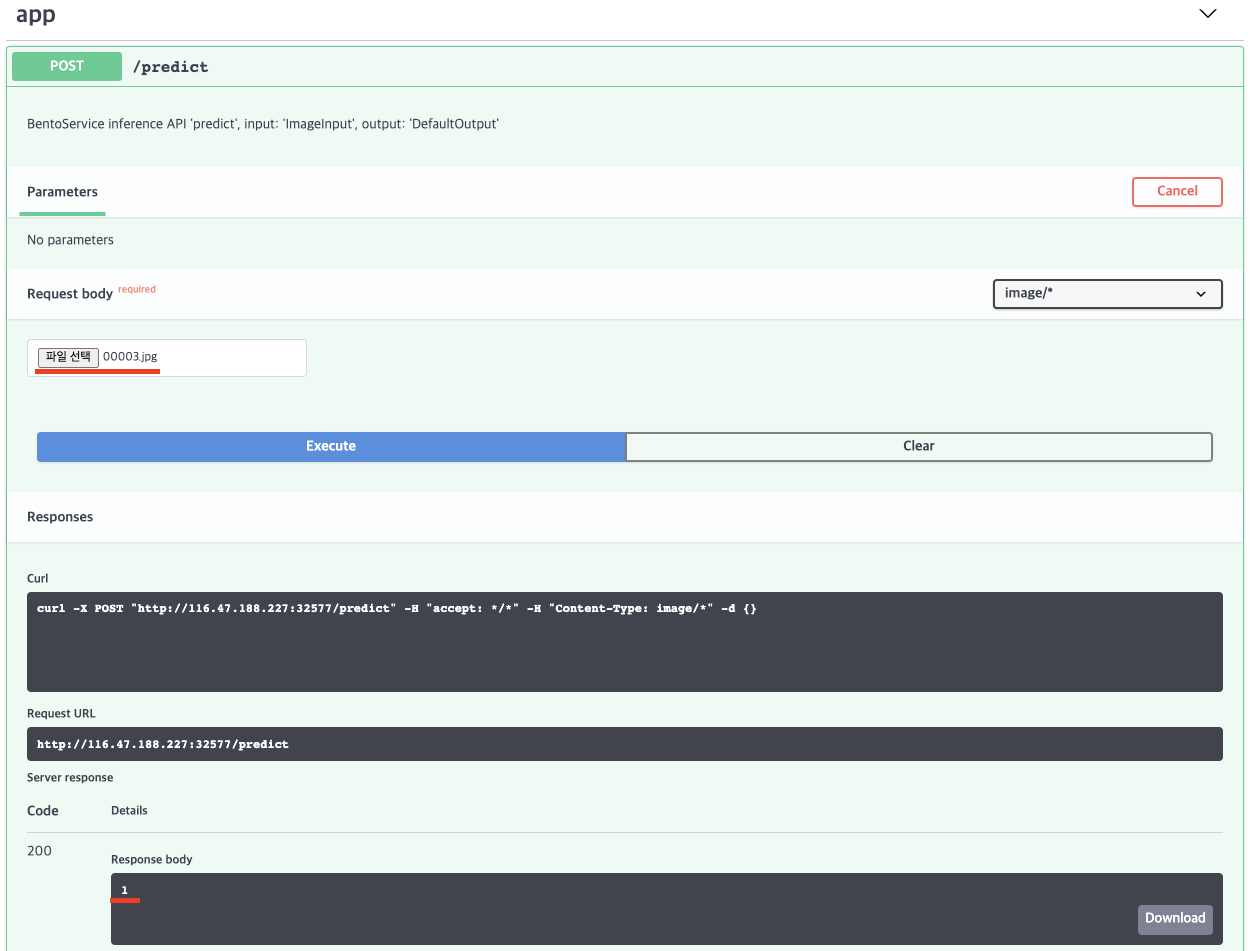
- bento_service.py에서 bentoml.adapters.ImageInput으로 @api 데코레이션을 주었기 때문에 입력을 이미지로 받게된다. 이미지는 표면에 금이간 Positive인 경우이며 response 결과로 1(Positive)가 나온것을 확인할 수 있다.
+ python requests로 inference를 진행할 땐 아래와 같이 이미지를 binary로 읽어서 requests.post를 보내면 위와 동일하게 응답이 오는것을 확인할 수 있다.
import requests

url = "{YOUR URL}/predict"

test_files = {
    "test_file_1": open("{YOUR PATH}/00003.jpg", "rb")
}

response = requests.post(url, files=test_files)
print(response.json())
8. Monitoring
Monitoring은 오픈소스 모니터링 툴인 Prometheus와 Grafana를 사용하였다. (여기에서 자세한 설명 및 설치방법 확인)
간단히 정리하자면 prometheus는 쿼리를 통해 쿠버네티스 리소스를 pull 하는 방식으로 metric을 뽑아내게 되고 이 metric을 grafana가 받아서 사용자가 보기 쉽게 그래프등으로 시각화 시켜준다고 생각하면 된다.
prometheus라는 이름으로 네임스페이스를 생성한 뒤 설치를 진행했고 service와 pod는 아래와 같다.
kubectl get svc,pod -n prometheus

밑줄로 표시한 부분이 UI로 접속할 수 있는 서비스이며 다음 port-forward 명령어로 외부에서 클러스터 모니터링 서비스에 접근할 수 있다.
# prometheus
kubectl port-forward svc/prometheus-prometheus-oper-prometheus -n prometheus 9090
# grafana
kubectl port-forward svc/prometheus-grafana -n prometheus 3000:80
Prometheus
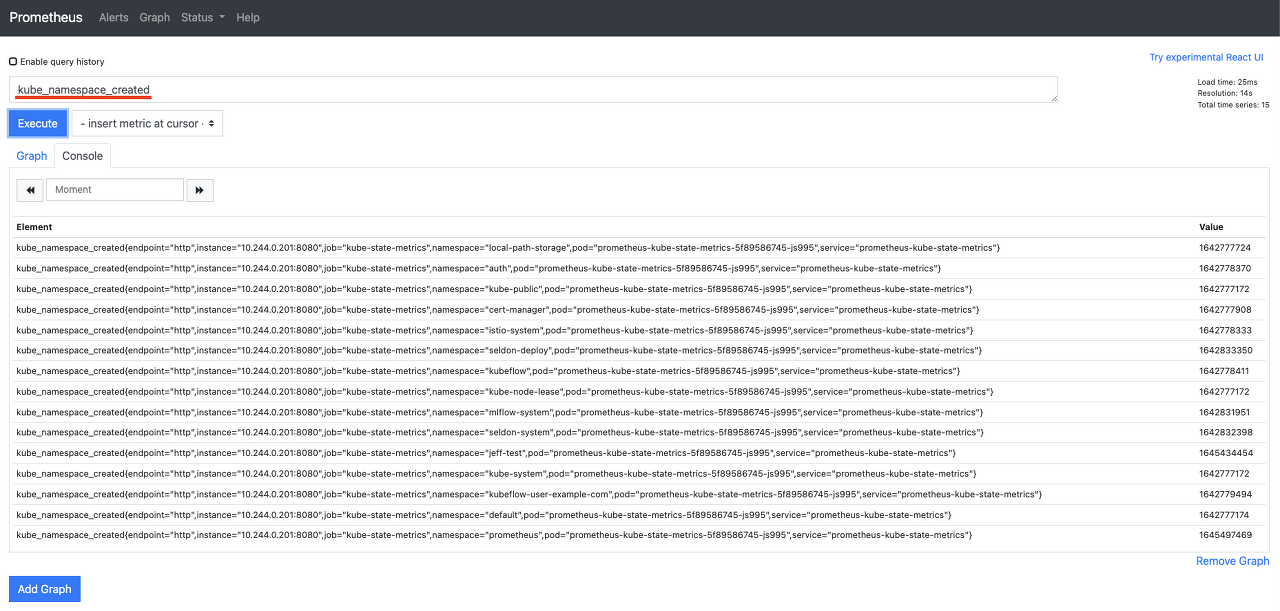
prometheus UI에서 쿼리(밑줄)를 작성할 수 있는데 위와같이 ‘kube_namespace_created’를 excute하면 현재 생성되어있는 네임스페이스를 출력하게 된다.
grafana
grafana UI에 접속을 하게되면 먼저 로그인을 하게 되어있는데 계정 정보는 prometheus 네임스페이스의 secret에 적혀있다. 다음명령어를 통해 확인할 수 있다.
kubectl get secret -n prometheus prometheus-grafana -o yaml
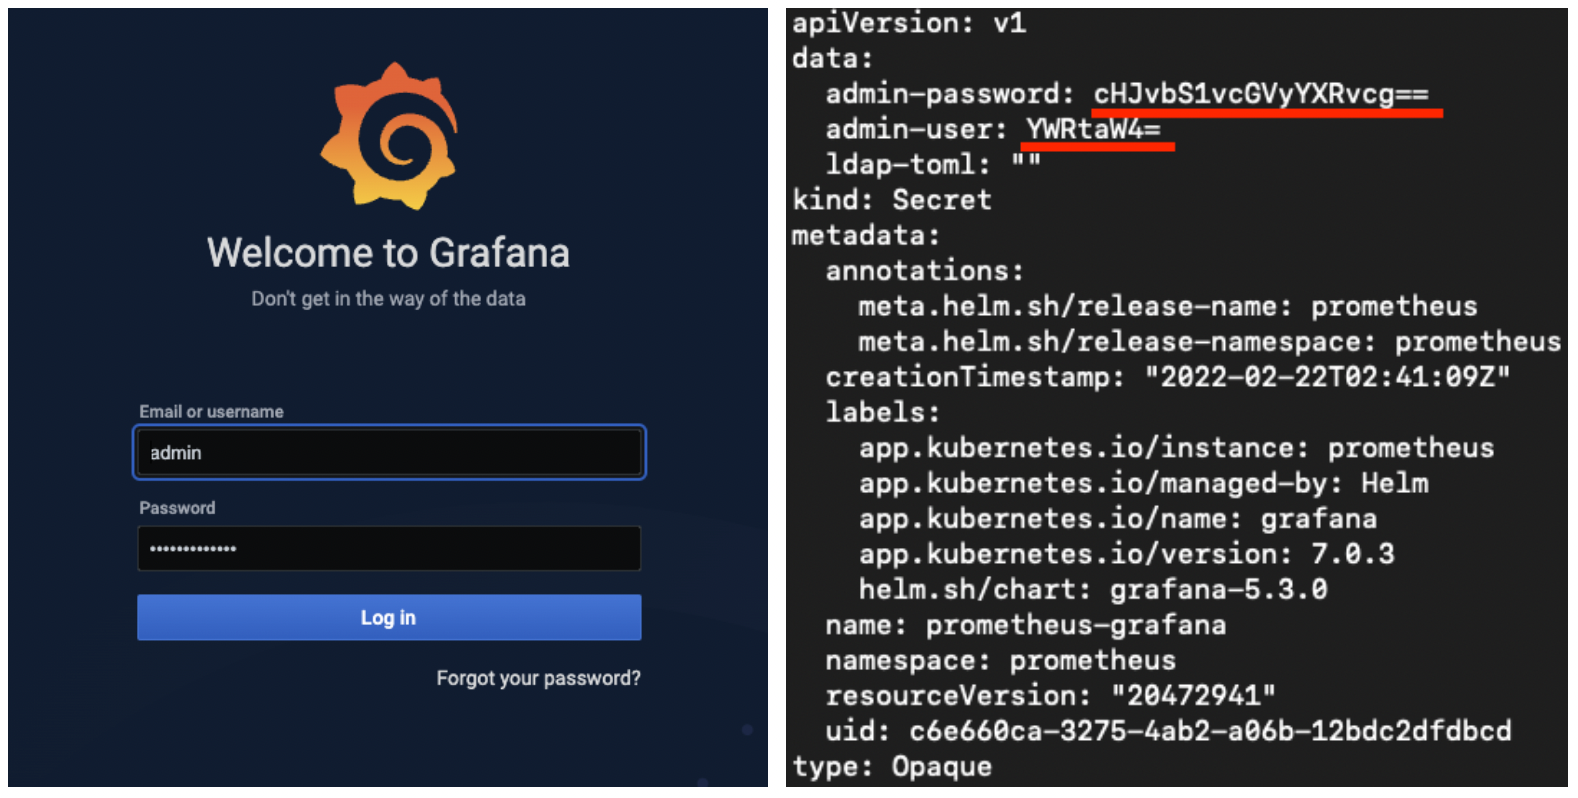
밑줄친 곳이 id와 password인데 base64 즉 ASCll 문자로 이루어져있기 때문에 이를 아래와 같이 디코딩 해주어야 한다.
echo "cHJvbS1vcGVyYXRvcg==" | base64 -d
# prom-operator
echo "YWRtaW4=" | base64 -d
# admin
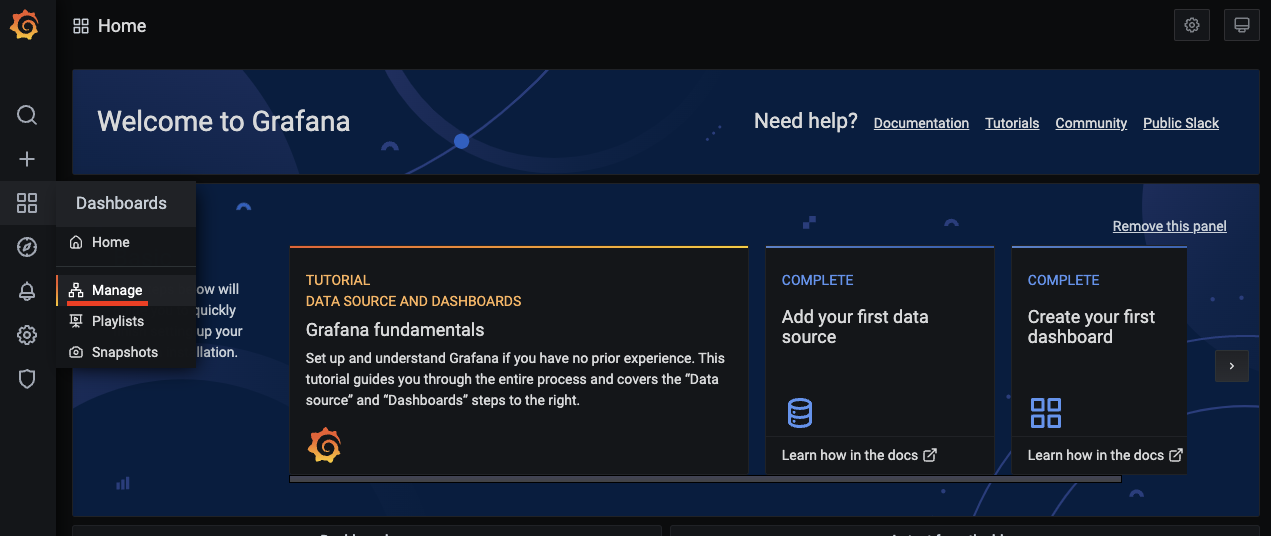
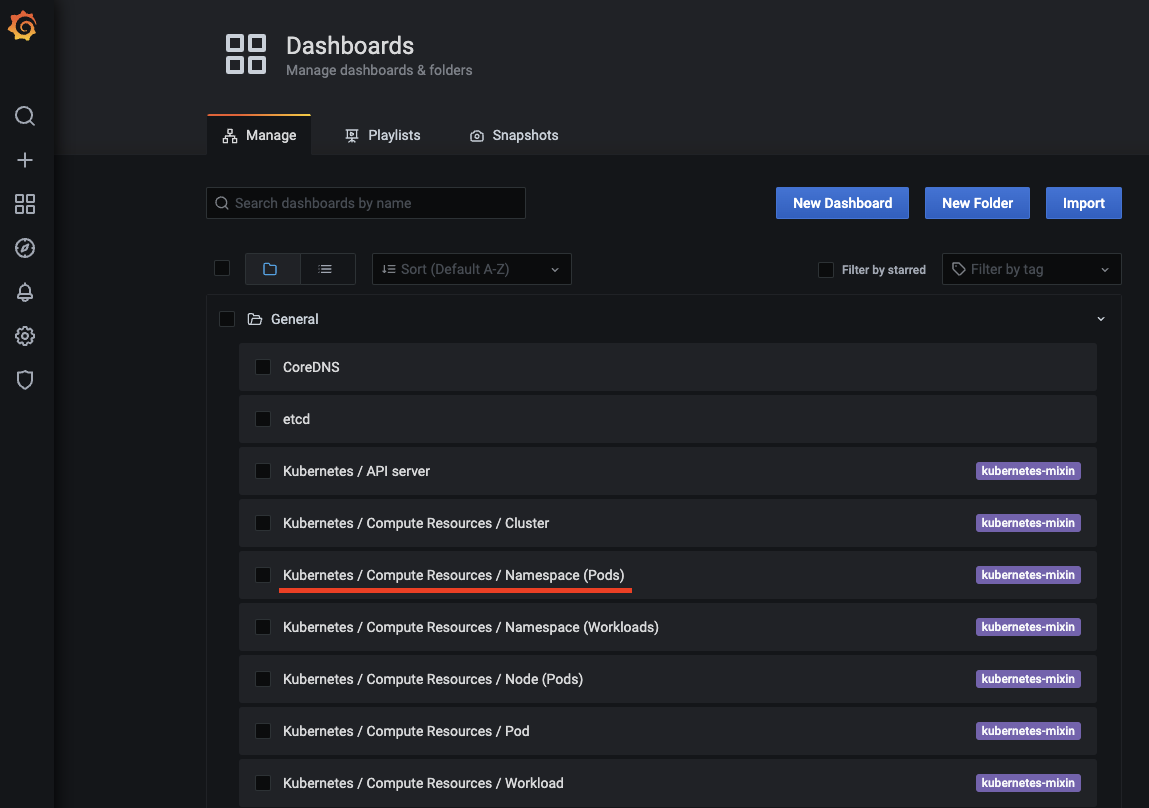
grafana에서 대부분의 쿠버네티스 리소스는 위 Manage 메뉴에서 관리할 수 있다. 위에서 kubeflow-user-example-com에 배포한 모델에 대한 리소스를 확인해보자
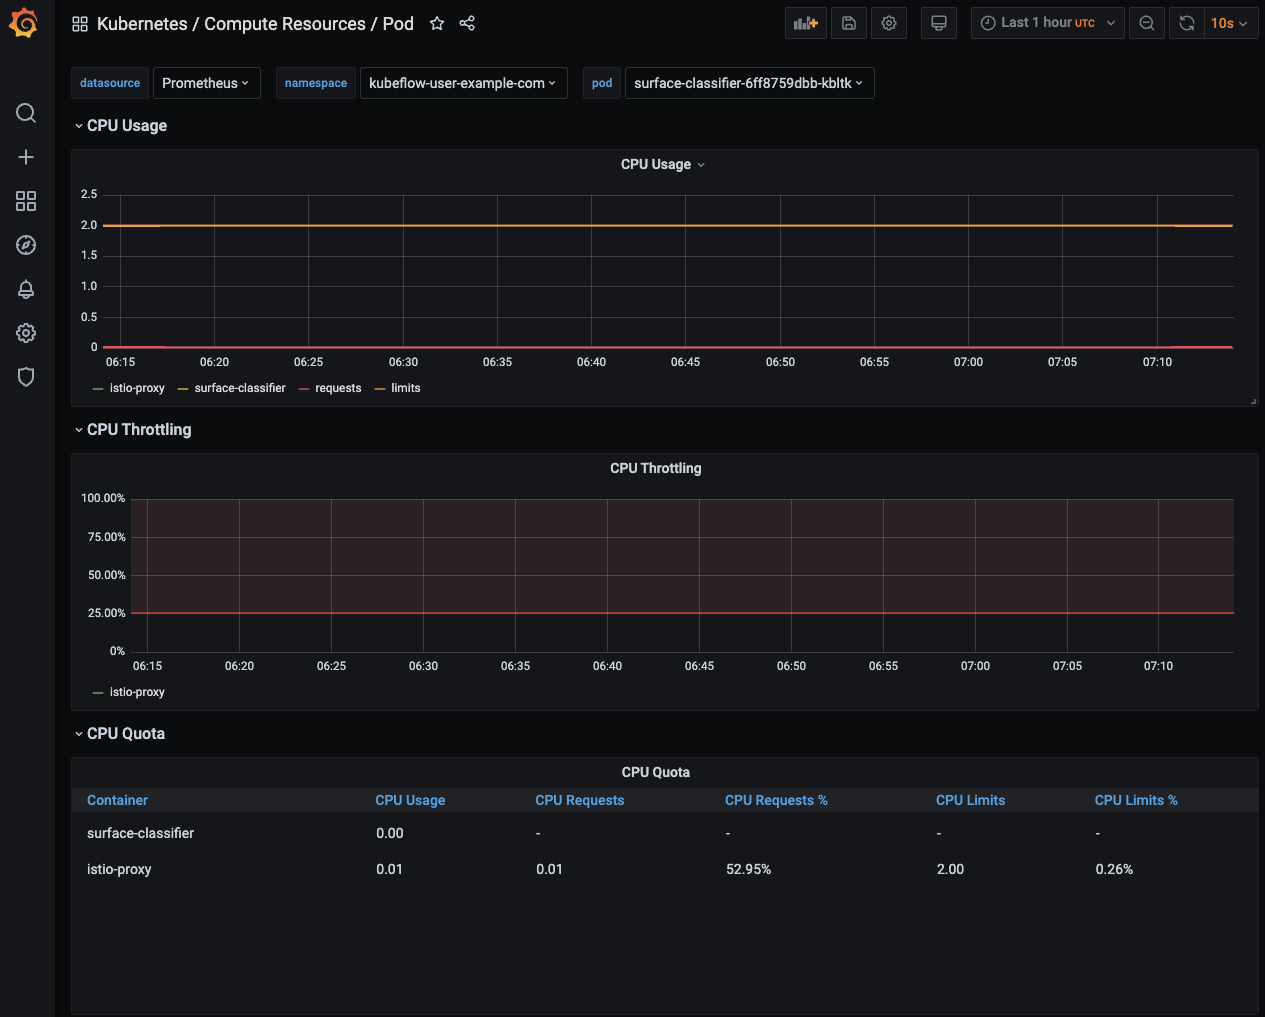
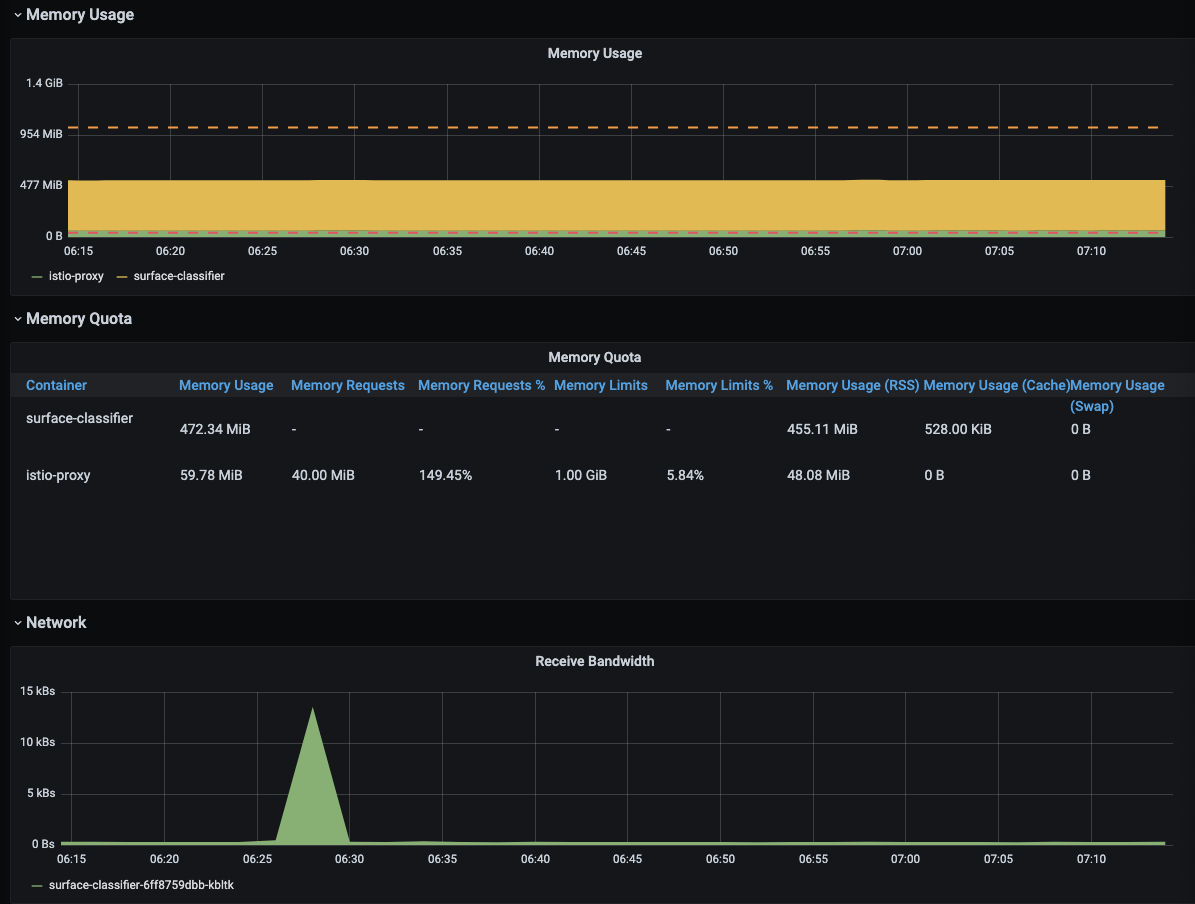
위에서 배포한 surface-classifier-6ff8759dbb-kbltk pod에 대한 리소스 정보를 가져왔다. 이와같이 grafana는 원하는 pod, service, namespace는 물론 클러스터및 노드에 대한 리소스 정보를 시각화 해주고 이것을 사용자에 맞게 커스터마이징 할 수 있다는 장점이 있다.
End
MLOps를 구축하기 위해 쿠버네티스를 공부하다보니 설치과정에서부터 애를많이 먹었고 다양한 툴을 사용해보느라 리소스 관리 측면에서 신경을 많이 쓰지 못했다. on-premise 환경에서 앞으로 어떻게 MLOps를 구축해 좀더 효율적으로 운용할 수 있을지 많이 고민이 필요할 것 같다.
keep going
Leave a comment