Intro
ComfyUI 는 노드 기반의 UI에서 쉽게 워크플로우를 구성하여 이미지 및 비디오를 생성할 수 있는 툴 입니다.
하지만 ComfyUI 를 SaaS 플랫폼으로서 제공하는 것은 무리입니다. 서비스를 만들고자 한다면 단순히 텍스트에서 이미지를 생성하는 간단한 워크플로우가 아니라 서비스의 목적에 따라 생성 앞, 뒤 단계에서 추가적인 작업이 필요 할 것입니다.
결국 이것을 UI 에서 구현한다고 하면 꽤 많은 숙련도를 필요로 하고 커스텀 노드에서 원하는 기능이 없다면 직접 코드를 작성해서 커스텀 노드를 개발해야 하는 상황도 발생합니다.
결국 ComfyUI 에서 작업한 워크플로우를 SaaS 플랫폼으로 제공하기 위해서는 ComfyUI 서버를 어딘가에서 잘 배포하고 API 로 어플리케이션과 통신할 수 있어야 합니다.
저는 사내에서 웹 기반 SaaS 플랫폼을 개발중이며 기존에 개발 환경(로컬 GPU 워크스테이션)에서 배포중이던 ComfyUI 서버를 실제 서비스 운영을 위해 클라우드 환경에 배포해야 하는 상황입니다.
오늘 포스팅에서는 이 ComfyUI 를 어떻게 클라우드 환경에 배포하여 어플리케이션에서 활용할 수 있는지에 대해 공유하고자 합니다.
Decision making
ComfyUI as Serving Frameworks?
ComfyUI의 Kickpoint
오픈소스 이미지 생성분야에서 무언가를 실험하거나 새로운 모델 및 기술을 구현할때 가장 먼저 ComfyUI에서 동작하도록 제공하는 추세입니다. 그리고 그 기술을 기존 워크플로우에서 일부만 수정하여 json파일로 export 하면 바로 서비스에 적용할 수 있어서 개발속도를 단축할 수 있다는 큰 장점이 있습니다.
Diffusers 라이브러리를 FastAPI, Triton, BentoML 같은 모델 서빙을 위한 프레임워크와 결합하여 좀 더 모델 서빙에 최적화된 API를 개발할 수 있지만 이 방식을 선택하게 되면 코드베이스로 이미지 생성 워크플로우를 구현해야 하기 때문에 개발 속도가 느려질수 밖에 없습니다.
스타트업에서 적은 인원으로 프로젝트를 진행하는 입장에서 개발속도를 단축하면서 빠르게 새로운 기술을 적용해서 사용자에게 제공하는 것이 중요하다고 판단되어 ComfyUI 서버 자체를 배포하는 방식을 선택하였습니다.
Serverless vs On-demand
서비스 측면
- 해당 서비스를 필요로 하는 사람은 특정 기업의 디자이너 혹은 개인사업자이기 때문에 동시접속자가 많지 않습니다.
- 해당 서비스는 Midjourney 처럼 이미지 생성이 메인인 서비스가 아니라 3D 에디터 기능을 포함한 웹 어플리케이션이기 때문에 이미지 생성은 서비스의 일부입니다.
모델 배포 측면
- ComfyUI에서는 Queue 방식으로 요청을 처리합니다. 요청을 배치단위로 처리하지 못하고 하나씩 처리해야 하기 때문에 10번째에 요청한 사람은 앞에 9개의 queue가 모두 끝나야 실행되는 방식으로 동작합니다.
- 이러한 지연시간을 방지하기 위해 사용자별로 ComfyUI 엔드포인트를 제공한다면 gpu가 1개인 워커가 있다고 가정했을때 서비스에 접속한 사용자에게 1개의 워커를 할당해야 하는 상황이 발생합니다.
위의 상황에서는 사실 반 강제적으로 Serverless 방식을 선택할 수 밖에 없었습니다. 언제 들어올지 모르는 요청을 위해 비싼 gpu 인스턴스를 준비시켜 놓기 위해 낭비되는 비용이 너무 컸습니다. 결국 ComfyUI 서버를 여러 워커에 배포하고 들어온 요청을 처리할때만 비용을 지불하게 되는 Serverless 방식을 선택했습니다.
Which Cloud?
웹 어플리케이션을 배포하려고 하는 클라우드 환경은 AWS 이기 때문에 AWS에서 모델서버를 배포하면 좋겠지만 AWS에서 제공하는 GPU는 생각보다 다양하지 않으며 비용도 충분히 저렴하지 않았습니다. 또한 Serverless를 고려한다고 하더라도 AWS의 Fargate 서비스는 여전히 GPU 인스턴스를 제공하지 않기 때문에 다른 클라우드 환경을 고려해야 했습니다.
제가 원하는 조건은 다음과 같았습니다.
- 상대적으로 저렴한 GPU 인스턴스
- Serverless 지원
- Auto Scaling 지원
이 세가지 조건에 부합하면서 안정적인 서비스를 제공할 수 있는 플랫폼은 RunPod와 Modal 이었습니다. 이중에 개인적으로 느끼기에 조금 더 커뮤니티가 활발하고 CI/CD를 적용하기 편한 RunPod를 선택하였습니다.
Prerequisites
- Dockerfile
- ComfyUI 및 Custom Node install 목록 리스트업 (requirements.txt)
- GitHub Connections in RunPod
Dockerfile
FROM nvidia/cuda:12.4.1-cudnn-runtime-ubuntu22.04

ENV DEBIAN_FRONTEND=noninteractive \
    PIP_PREFER_BINARY=1 \
    PYTHONUNBUFFERED=1 \
    CMAKE_BUILD_PARALLEL_LEVEL=8 \

RUN apt-get update && \
    apt-get install -y --no-install-recommends \
        software-properties-common \
        git \
        wget \
        libgl1 \
        git-lfs && \
    add-apt-repository ppa:deadsnakes/ppa && \
    apt-get update && \
    apt-get install -y --no-install-recommends \
        python3.12 \
        python3-pip && \
    ln -sf /usr/bin/python3.12 /usr/bin/python && \
    ln -sf /usr/bin/pip3 /usr/bin/pip && \
    git lfs install && \
    apt-get autoremove -y && \
    apt-get clean && \
    rm -rf /var/lib/apt/lists/*

RUN --mount=type=cache,target=/root/.cache/pip \
    pip install --no-cache-dir --upgrade pip wheel setuptools && \
    pip install --no-cache-dir \
        huggingface_hub[hf_transfer] \
        torch \
        torchvision \
        torchaudio \
        xformers \
        --index-url https://download.pytorch.org/whl/cu124 \
        --extra-index-url https://pypi.org/simple

COPY ComfyUI /ComfyUI

# 필요로 하는 모델 경로에 맞춰 수정해 주세요.
RUN HF_HUB_ENABLE_HF_TRANSFER=1 huggingface-cli download <repo path> <file path> --local-dir /ComfyUI/models

COPY ComfyUI/requirements.txt /tmp/requirements.txt
RUN --mount=type=cache,target=/root/.cache/pip \
    pip install --no-cache-dir -r /tmp/requirements.txt

COPY start.sh /start.sh
COPY rp_handler.py /rp_handler.py

CMD ["bash", "/start.sh"]
위 Dockerfile에 대해 몇가지 살펴보겠습니다.
- Model-in-Docker
- Huggingface 로부터 모델파일을 다운로드받는 부분이 있는 것으로 보아 도커파일에 모델을 포함시키는 Model-in-Docker 방식이라는 것을 짐작할 수 있습니다. 이 방식을 사용하면 모델 파일을 다운로드 받는 시간과 무거워진 이미지 크기로 인해 빌드 시간이 오래 걸리는 단점이 있으며 리소스적인 측면에서도 문제가 될 수 있습니다.
- 이 문제를 벗어나기 위헤 Runpod의 Network Volume을 활용하여 NFS 방식으로 워커에서 해당 Volume에 있는 모델을 로드하는 방식으로 해결할 수 있지만, 테스트 결과 해당 방식을 사용하면 제가 사용하는 모델 기준으로 Cold Start가 1분 40초가 넘어가는 문제가 있었습니다.
- 최근 RunPod에서 Beta 버전으로 이미지 CI/CD 자동화를 위해 Github Actions와 비슷한 기능을 자체적으로 제공하는 Deploying with GitHub 기능이 생겼습니다. 이 기능을 활용하면 별도의 추가비용 없이 특정 브랜치에 대한 push 에 대해 해당 브랜치의 Dockerfile 을 기반으로 자동으로 빌드 및 엔드포인트 워커들이 rolling update 되도록 하는 기능을 제공합니다.
- Custom Node
rp_handler.py
import runpod
import json
import uuid
import base64
import websockets
import urllib.request
import urllib.parse
import time
import requests
import asyncio

COMFY_HOST = "127.0.0.1:8188"
COMFY_API_AVAILABLE_INTERVAL_MS = 50
COMFY_API_AVAILABLE_MAX_RETRIES = 500
WEBSOCKET_TIMEOUT = 180

# 중간 생략
async def handler(job):
    job_input = job["input"]

    if not job_input:
        return {"error": "No input provided."}

    if isinstance(job_input, str):
        job_input = json.loads(job_input)

    workflow = job_input.get("workflow")

    if not workflow:
        return {"error": "Missing 'workflow' parameter in input."}

    client_id = str(uuid.uuid4())

    try:
        output = await asyncio.wait_for(
            get_images_over_websocket(workflow, client_id, job),
            timeout=WEBSOCKET_TIMEOUT
        )
    except asyncio.TimeoutError:
        return {
            "status": "timeout",
            "images": None
        }
    except Exception as e:
        return {"error": str(e)}

    runpod.serverless.progress_update(job, "Finished. Returning results.")
    return output


if __name__ == "__main__":
    check_server(
        f"http://{COMFY_HOST}",
        COMFY_API_AVAILABLE_MAX_RETRIES,
        COMFY_API_AVAILABLE_INTERVAL_MS,
    )

    runpod.serverless.start({"handler": handler, "return_aggregate_stream": True})
rp_handler는 실제 클라이언트가 보낸 요청을 처리하는 함수입니다. serverless endpoint로 요청이 들어오면 이 파일내부의 handler 함수가 실행되는 구조로 설계되었습니다. 때문에 워커에서 실행되는 모든 코드는 이 함수 내부에 작성되어야 합니다. 여기서 몇가지 포인트에 대해 좀 더 살펴보겠습니다.
- 입력 형식
- handler에서는 json을 받도록 설계되어 있으며 저는 아래와 같은 형식으로 설정했습니다.
-
{
 "input": {
 "workflow": workflow_api_json
 }
}
- workflow_api_json 에는 ComfyUI 에서 작업한 워크플로우를 api 형태로 export 한 json 파일이 입력되어야 합니다.
- ComfyUI WebSocket and polling
- ComfyUI 에서는 WebSocket을 통해 현재 Queue의 상태를 가져올 수 있습니다. 하지만 여기서 ComfyUI 와 통신할 수 있는 주체는 핸들러 뿐이기 때문에 localhost:8188(ComfyUI 서버) 주소로 웹소켓을 연결하여 ComfyUI 서버로부터 이벤트(generation progress)를 가져옵니다.
- 이후 핸들러에서 runpod.serverless.progress_update() 함수로 상태를 기록하고 클라이언트측에서 status polling 방식을 통해 비로소 클라이언트측에서 현재 작업상태를 업데이트 할 수 있습니다.
- 이 방식으로 지속적으로 현재 progress 상태 혹은 latent image 를 클라이언트 어플리케이션에서 렌더링하여 좀 더 나은 사용자 경험을 제공할 수 있습니다.
RunPod Serverless
Runpod의 Serverless기능을 사용하기 위해서는 Runpod 콘솔에 접속하여 로그인과 Credit을 충전해야 합니다. (회원가입시 기본으로 1달러 크레딧이 충전되어 있음)
-
콘솔 좌측 사이드바에서 Serverless 메뉴에서 New Endpoint 버튼을 누릅니다.
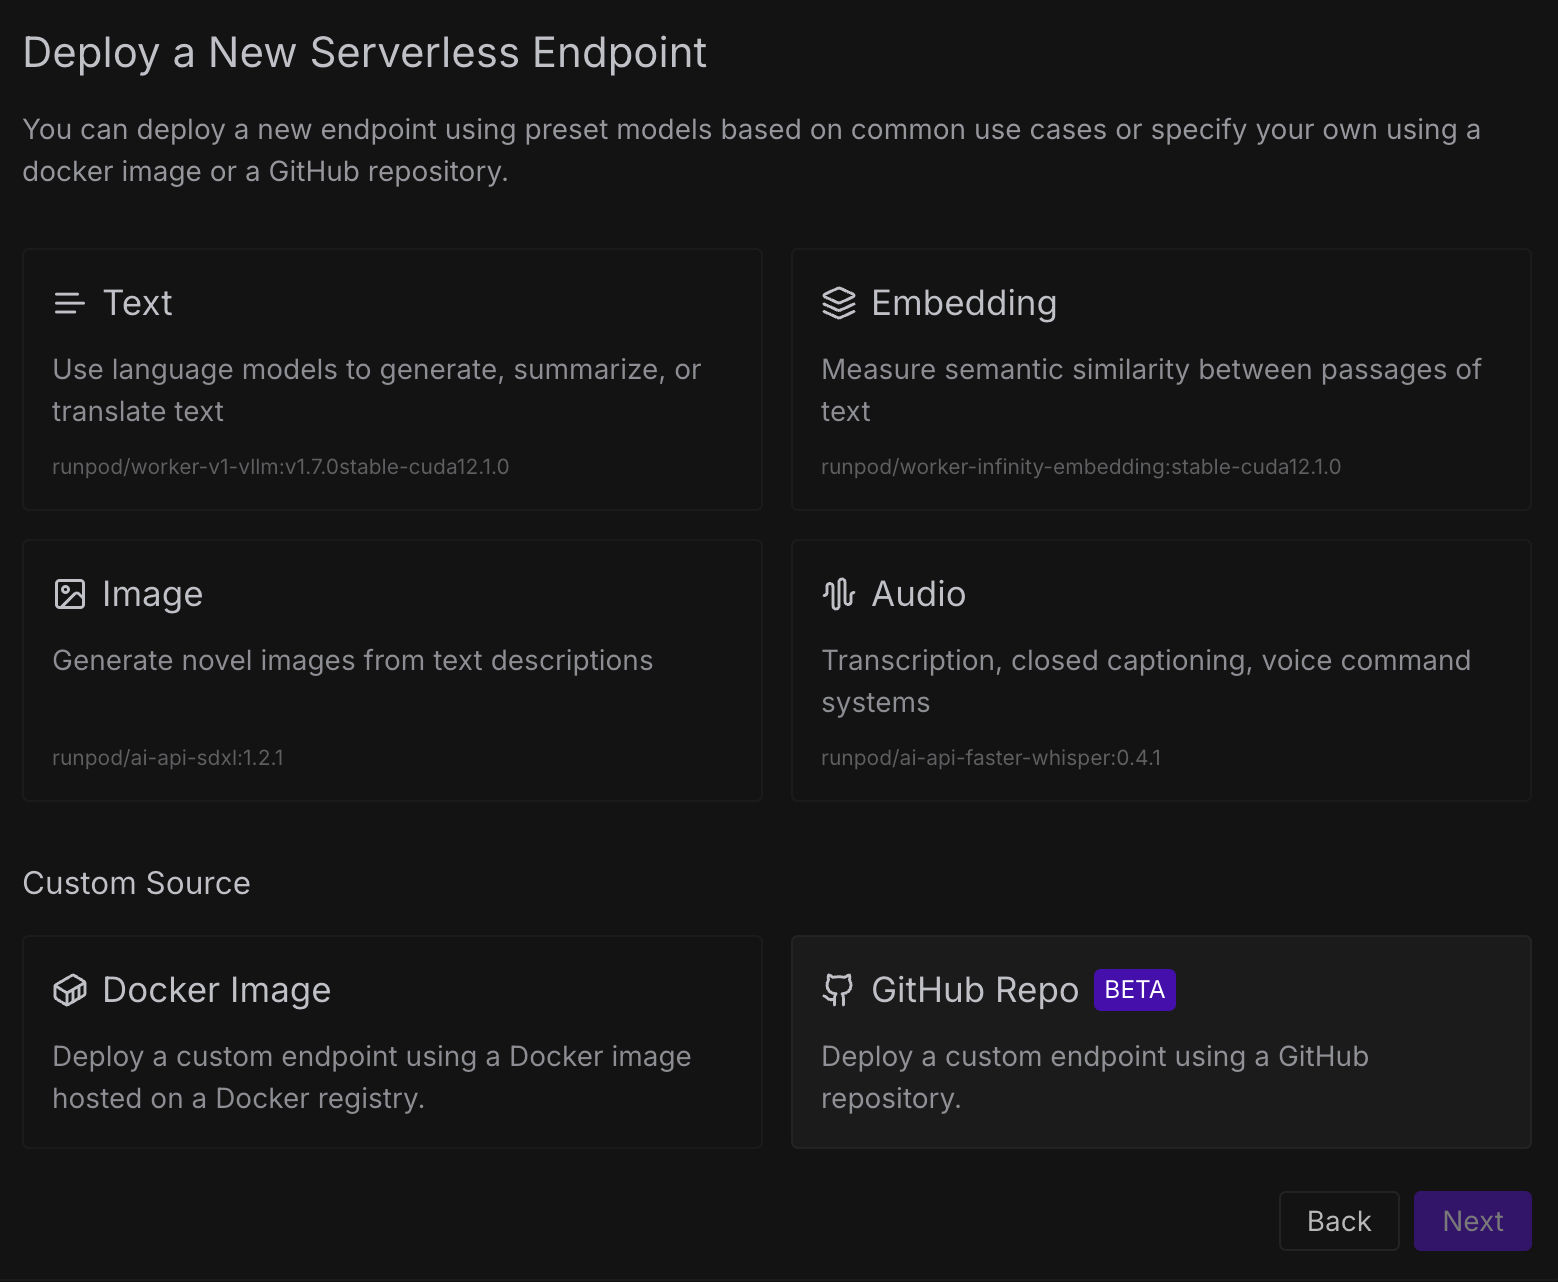
엔드포인트를 생성할때 runpod 측에서 사전에 미리 정의된(vllm, stable diffusion) 이미지를 사용할 수 있으며 직접 커스텀 빌드한 도커허브의 이미지를 사용할 수 있습니다.
여기서 저는 GitHib Repository를 활용하여 이미지를 자동으로 빌드하기 위해 GitHub Repo를 클릭하겠습니다.
미리 Github 계정을 연동해 두었다면 계정의 모든 Repository가 보이게 됩니다. 여기서 사용할 repo를 선택하고 다음으로 넘어갑니다.
-
원하는 브랜치와 도커파일의 경로를 입력합니다. 저는 base라는 이름의 브랜치의 루트경로에 있는 Dockerfile 을 활용하겠습니다.

-
다음으로 엔드포인트 이름, GPU, 배포 옵션등을 설정합니다.
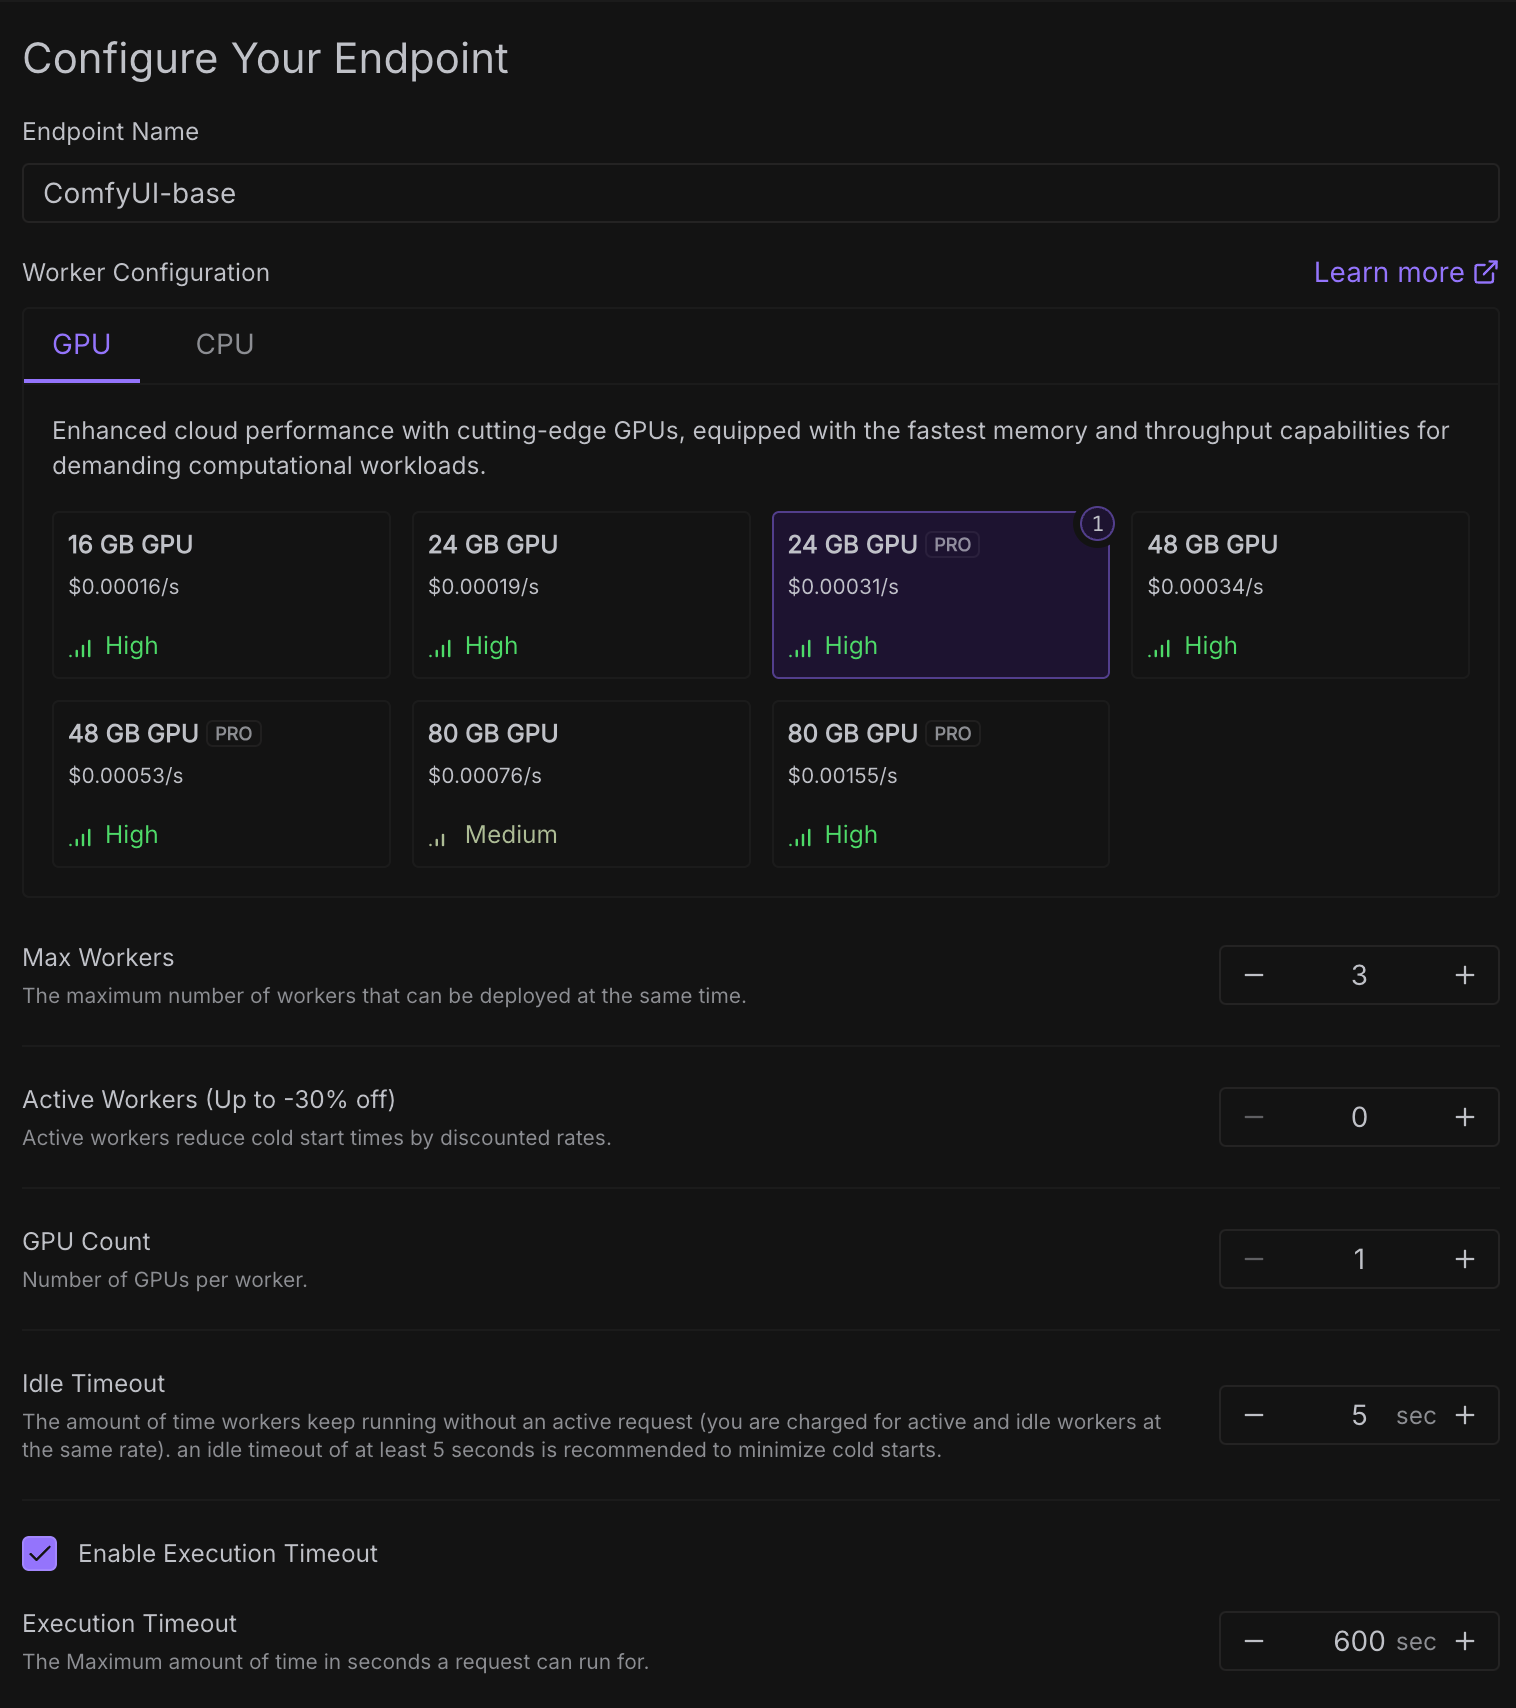
각 GPU 카드에 보이는 것 처럼 비용은 초 단위로 계산되어 청구됩니다. 이는 워커가 실행되는 시간에 따라 비용이 청구되기 때문입니다.
Max Workers 는 요청을 처리할 수 있는 대기중인 워커의 수를 의미합니다. 쉽게말해 3으로 설정하면 3개의 ComfyUI 서버가 준비된다는 의미입니다. (워커당 1개의 ComfyUI가 서버가 실행된다는 가정)
Active Workers는 항상 Ready 상태인 워커를 의미합니다. 설정한 워커 수만큼의 워커들은 다운되지 않기 때문에 모든 시간에 대해 비용이 청구됩니다. Cold Start 문제에 예민한 task라면 고려해볼 수 있습니다.
-
Advanced Options
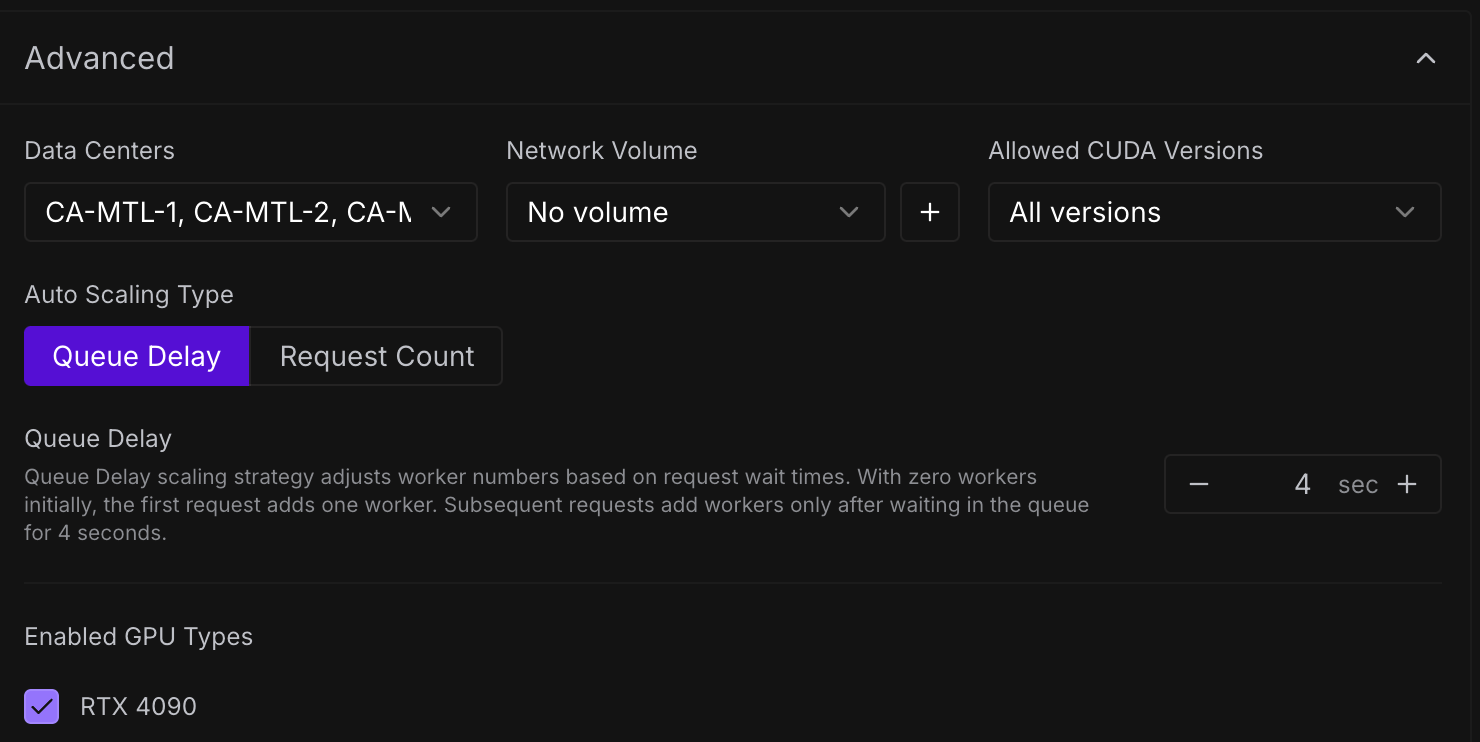
Advanced Options에서는 워커의 리전을 특정할 수 있으며 Network Volume을 연결할 수 있습니다.
Network Volume을 사용하면 단점이 Network Volume을 생성할때 지정한 리전으로 워커의 리전이 고정되는 문제가 있습니다. 이렇게 되면 GPU 가용성이 안정적이지 못하기 때문에 상황에 따라 워커가 새로 생성되지 못하는 문제가 발생할 수 있습니다.
Queue Delay는 어떤 요청으로 인해 Idle -> Ready 상태가 된 워커를 언제 다시 Idle 상태로 내릴지에 대한 시간을 설정합니다. 이 시간을 늘릴수록 cold start를 줄일 수 있지만 저 시간동안 비용은 그대로 청구되므로 상황에 맞게 조절해 주시면 됩니다.
-
Build & Check Workers
엔드포인트를 생성하면 자동으로 이미지가 Build되는 것을 확인할 수 있습니다.

빌드가 정상 완료되면 이어서 설정한 워커 수만큼 워커가 생성되는 것을 확인할 수 있습니다.
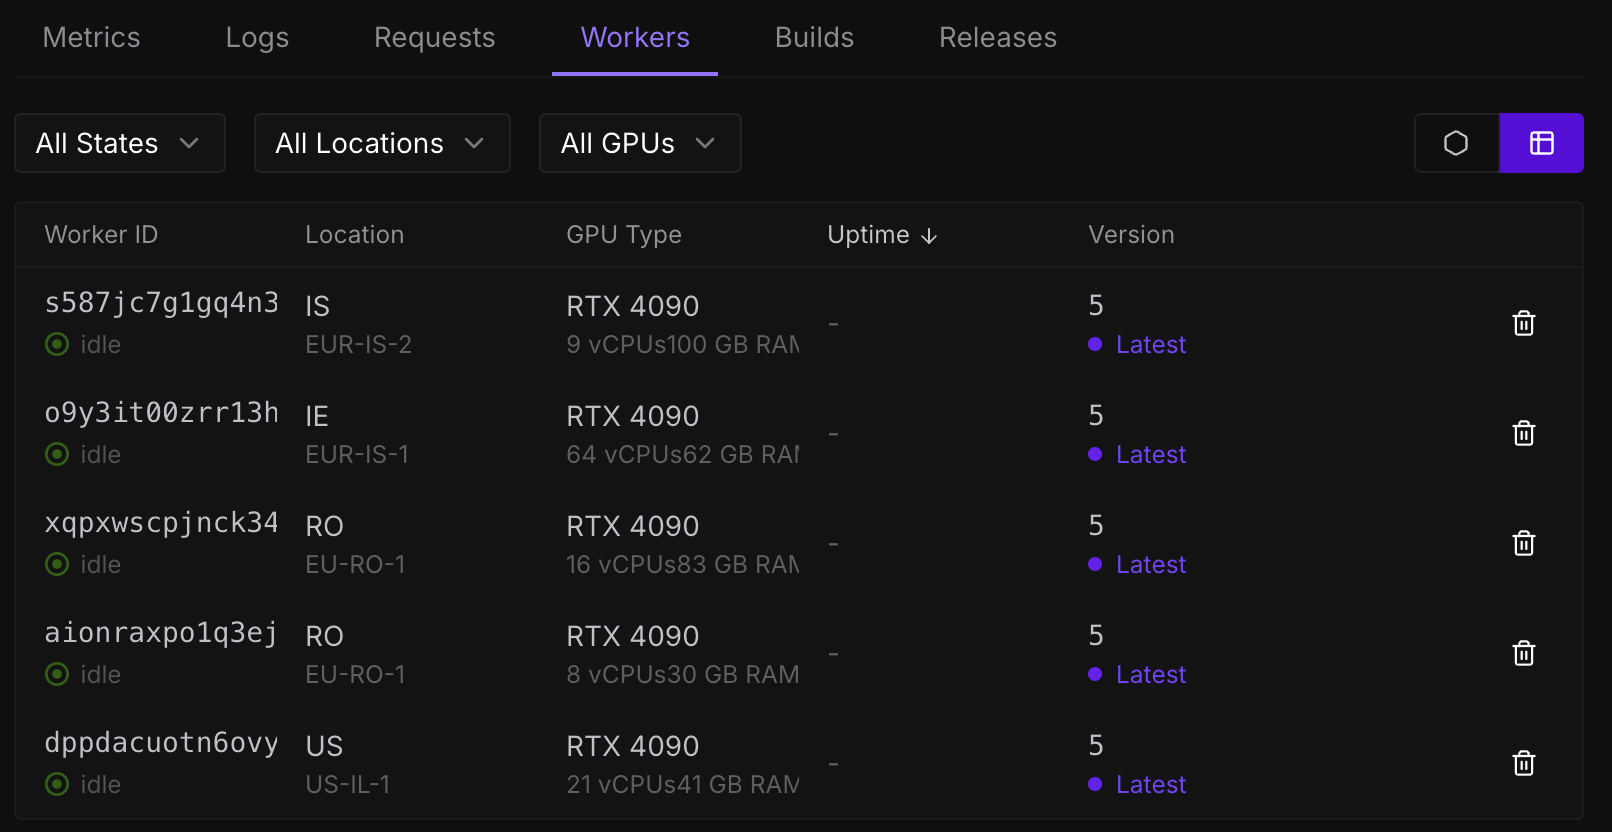
이미지에 보이는 것 처럼 동일한 GPU를 여러 리전에서 다른 스펙의 워커가 생성된 것을 볼 수 있습니다.
Application(Client) Side
RunPod 에서는 클라이언트에서 엔드포인트와 쉽게 통신하도록 여러가지(Go, GraphQL, JavaScript, Python) SDK를 지원합니다.
저는 Next.js 기반의 웹 어플리케이션을 개발하고 있어 JavaScript SDK를 적용하였습니다.
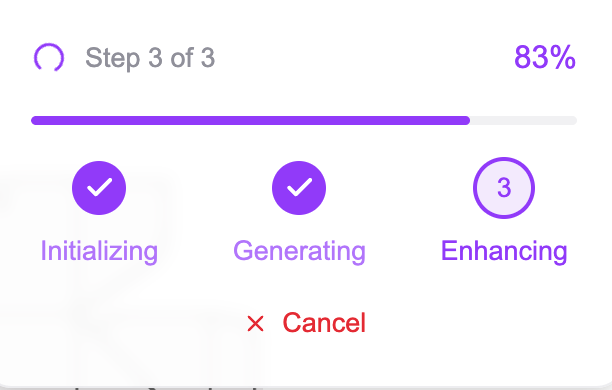
전처리 + 생성1 + 생성2 총 3개의 스텝으로 나뉘어 있으며 각 스텝의 progress 상태를 지속적으로 polling하여 진행상황을 사용자에게 보여주도록 설계하였습니다.
Test
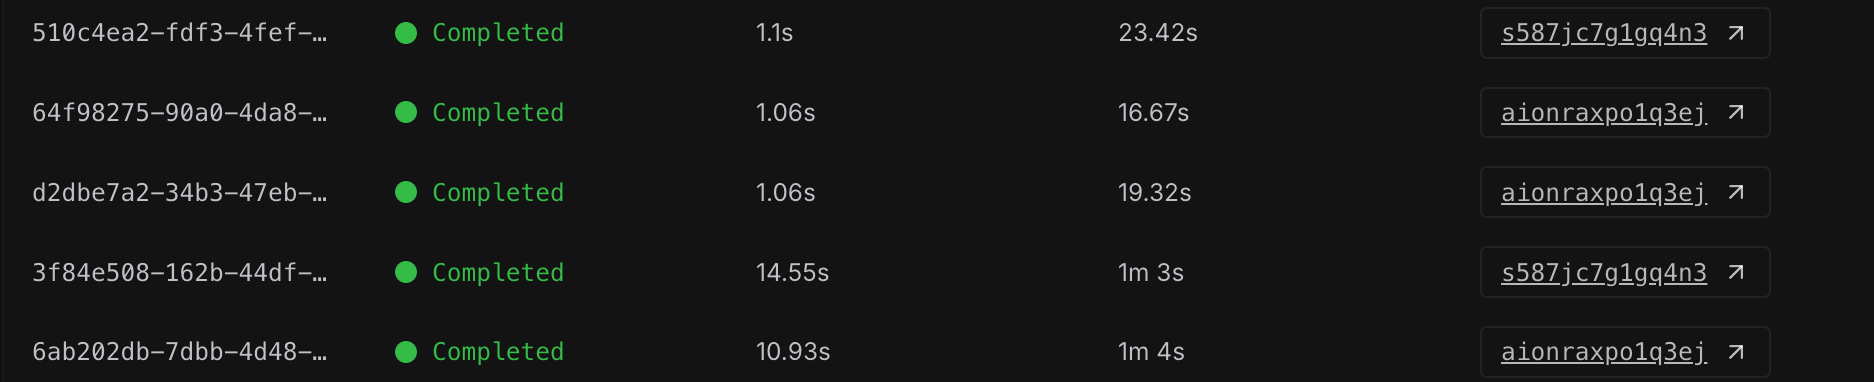
몇번의 request 테스트 결과입니다.
왼쪽에서 순서대로 Task ID, Status, Delay Time, Execution Time, Worker ID 입니다.
delay time은 워커가 준비되는 시간, 즉 cold start이며 execution time은 task가 실행되는 시간입니다.
워커별로 첫 delay time이 평균 13초정도 소요되며 execution time은 ComfyUI 실행 + 모델 로딩 + 생성시간으로 인해 1분정도 소요되었습니다. 이후에는 정상화되어 deplay time과 execution time이 안정적으로 수렴되는 것을 확인할 수 있습니다.
지연시간과 실행시간은 GPU 스펙과 리전에 따라 차이가 있기 때문에 여러 방법의 테스트가 필요합니다.
Conclusion
RunPod Serverless를 테스트하면서 좋았던 점은 GitHub을 활용한 CI 자동화가 가능하다는 점이었습니다.
특히 Model-in-Docker 방식을 사용하기 때문에 이미지의 크기 문제로 Github Actions를 사용하기도 제한적이었으며 자체 서버에서 CI를 위해 별도의 리소스와 관리가 필요했을 것입니다.
하지만 아직 베타버전이어서 Dockerfile에서 secret(ex. Huggingface token)을 사용할 수 없으며 배포중 에러가 발생하거나 배포 시간이 오래 걸리는 문제가 있어 좀 더 지켜봐야 할 것 같습니다.
Keep Going.
Intro
ComfyUI is a tool that allows you to easily configure workflows in a node-based UI to generate images and videos.
However, providing ComfyUI as a SaaS platform is not feasible. If you want to build a service, it will require additional work before and after the generation step depending on the purpose of the service, rather than a simple text-to-image workflow.
Ultimately, if you try to implement this in the UI, it requires quite a bit of proficiency, and if the custom nodes don’t have the functionality you want, you might end up having to write your own code to develop custom nodes.
In conclusion, in order to offer the workflow created in ComfyUI as a SaaS platform, you need to deploy the ComfyUI server somewhere and communicate with the application via API.
I am currently developing a web-based SaaS platform in my company, and I faced a situation where I need to deploy the ComfyUI server, which was previously deployed in a local GPU workstation development environment, to a cloud environment for actual service operation.
In today’s post, I’d like to share how to deploy ComfyUI in a cloud environment and utilize it in your application.
Decision making
ComfyUI as Serving Frameworks?
ComfyUI’s Kickpoint
- Active community
- Fast development speed
In the open-source image generation field, there’s a trend to first ensure that new models and technologies run on ComfyUI when experimenting or implementing something new. Additionally, you can quickly apply that technology to your service simply by making minor modifications to the existing workflow and exporting it as a JSON file. This provides a significant advantage in speeding up development.
Although you can combine the Diffusers library with frameworks for model serving like FastAPI, Triton, or BentoML to develop a more optimized API for model serving, this approach requires implementing your image generation workflow as code, inevitably slowing down development.
From a startup perspective, with a small team working on projects, it’s crucial to provide users with new technologies quickly, while also shortening development time. Therefore, we decided to deploy the ComfyUI server itself.
Serverless vs On-demand
From the service standpoint:
- The service is intended for a specific company’s designer or individual business owner, so there aren’t many concurrent users.
- This service is not primarily focused on image generation like Midjourney; it’s a web application that includes 3D editor functionality, where image generation is just a part of the service.
From the model deployment standpoint:
- ComfyUI handles requests in a queue. It can’t process requests in batches; each request is processed one by one. So, if you’re 10th in line, you have to wait for the previous 9 queued tasks to finish before your request is executed.
- To avoid this delay, if you were to provide a separate ComfyUI endpoint for each user (assuming there is one worker with a single GPU), you would end up having to allocate one worker per connected user.
In this situation, you’re essentially forced into a serverless approach. Keeping an expensive GPU instance ready for requests that could come at any time leads to too much waste. So, we chose the serverless approach, deploying multiple ComfyUI servers on various workers and paying only when a request arrives.
Which Cloud?
Because the web application is being deployed on AWS, it would be nice to deploy the model server on AWS as well. However, AWS’s GPU offerings are not as diverse as expected, nor are they particularly cheap. Moreover, even if we consider serverless, AWS Fargate still doesn’t support GPU instances, so we had to look elsewhere.
The conditions I was looking for were:
- Relatively inexpensive GPU instances
- Serverless support
- Auto Scaling support
Platforms that fit these three conditions and can provide a stable service were RunPod and Modal. Out of these, I felt RunPod had a somewhat more active community and was more convenient for applying CI/CD, so I chose RunPod.
Prerequisites
- Dockerfile
- List of ComfyUI and custom node install requirements (requirements.txt)
- GitHub Connections in RunPod
Dockerfile
FROM nvidia/cuda:12.4.1-cudnn-runtime-ubuntu22.04

ENV DEBIAN_FRONTEND=noninteractive \
    PIP_PREFER_BINARY=1 \
    PYTHONUNBUFFERED=1 \
    CMAKE_BUILD_PARALLEL_LEVEL=8 \

RUN apt-get update && \
    apt-get install -y --no-install-recommends \
        software-properties-common \
        git \
        wget \
        libgl1 \
        git-lfs && \
    add-apt-repository ppa:deadsnakes/ppa && \
    apt-get update && \
    apt-get install -y --no-install-recommends \
        python3.12 \
        python3-pip && \
    ln -sf /usr/bin/python3.12 /usr/bin/python && \
    ln -sf /usr/bin/pip3 /usr/bin/pip && \
    git lfs install && \
    apt-get autoremove -y && \
    apt-get clean && \
    rm -rf /var/lib/apt/lists/*

RUN --mount=type=cache,target=/root/.cache/pip \
    pip install --no-cache-dir --upgrade pip wheel setuptools && \
    pip install --no-cache-dir \
        huggingface_hub[hf_transfer] \
        torch \
        torchvision \
        torchaudio \
        xformers \
        --index-url https://download.pytorch.org/whl/cu124 \
        --extra-index-url https://pypi.org/simple

COPY ComfyUI /ComfyUI

# Modify according to the model path you need.
RUN HF_HUB_ENABLE_HF_TRANSFER=1 huggingface-cli download <repo path> <file path> --local-dir /ComfyUI/models

COPY ComfyUI/requirements.txt /tmp/requirements.txt
RUN --mount=type=cache,target=/root/.cache/pip \
    pip install --no-cache-dir -r /tmp/requirements.txt

COPY start.sh /start.sh
COPY rp_handler.py /rp_handler.py

CMD ["bash", "/start.sh"]
Let’s review a few points about the above Dockerfile:
- Model-in-Docker
- There’s a section that downloads model files from Hugging Face, indicating a Model-in-Docker approach. This approach can lead to longer build times due to the time it takes to download the model files and because the image becomes larger, which can also be an issue from a resource perspective.
- To avoid this, you could use RunPod’s Network Volume in an NFS manner so that the worker loads the model from that volume. However, in my tests, the cold start time exceeded 1 minute and 40 seconds with the models I use.
- Recently, RunPod introduced a Beta version feature called Deploying with GitHub, which is similar to GitHub Actions and is intended for automatic image CI/CD. With this, you can automatically build images and perform rolling updates on endpoint workers whenever you push to a specific branch, without incurring additional costs.
- Custom Node
- If you’re using a custom node, you need to figure out how to containerize it. If you’re not using a self-developed custom node, each one likely has its own GitHub repository and a
.git folder in that directory.
-
You could take a snapshot approach to install custom nodes, but I wanted to ensure consistency and reproducibility in deployments, so I chose to remove the .git folders from each custom node and include those nodes directly in the container.
   # Check for .git directories to remove
   find custom_nodes -type d -name ".git"
   # Remove .git directories
   find custom_nodes -type d -name ".git" -exec rm -rf {} +
- However, to use this approach, the libraries needed to run the custom nodes must be listed in requirements.txt.
rp_handler.py
import runpod
import json
import uuid
import base64
import websockets
import urllib.request
import urllib.parse
import time
import requests
import asyncio

COMFY_HOST = "127.0.0.1:8188"
COMFY_API_AVAILABLE_INTERVAL_MS = 50
COMFY_API_AVAILABLE_MAX_RETRIES = 500
WEBSOCKET_TIMEOUT = 180

# Some parts omitted
async def handler(job):
    job_input = job["input"]

    if not job_input:
        return {"error": "No input provided."}

    if isinstance(job_input, str):
        job_input = json.loads(job_input)

    workflow = job_input.get("workflow")

    if not workflow:
        return {"error": "Missing 'workflow' parameter in input."}

    client_id = str(uuid.uuid4())

    try:
        output = await asyncio.wait_for(
            get_images_over_websocket(workflow, client_id, job),
            timeout=WEBSOCKET_TIMEOUT
        )
    except asyncio.TimeoutError:
        return {
            "status": "timeout",
            "images": None
        }
    except Exception as e:
        return {"error": str(e)}

    runpod.serverless.progress_update(job, "Finished. Returning results.")
    return output


if __name__ == "__main__":
    check_server(
        f"http://{COMFY_HOST}",
        COMFY_API_AVAILABLE_MAX_RETRIES,
        COMFY_API_AVAILABLE_INTERVAL_MS,
    )

    runpod.serverless.start({"handler": handler, "return_aggregate_stream": True})
rp_handler.py is where the function that processes the actual client requests is located. When a request arrives at the serverless endpoint, the handler function in this file is executed. Therefore, any code that needs to run on the worker must be written inside this function. Here are a few points worth noting:
- Input format
- The handler is designed to receive JSON, and I set it up as follows:
{
  "input": {
    "workflow": workflow_api_json
  }
}
workflow_api_json should be the API-exported JSON file of the workflow that was created in ComfyUI.
- ComfyUI WebSocket and polling
- ComfyUI provides a WebSocket interface that gives the current queue status. However, the only entity that can communicate with ComfyUI in this scenario is the handler, so the handler connects to the WebSocket at
localhost:8188 (the ComfyUI server) to receive events (generation progress) from ComfyUI.
- The handler then uses the function runpod.serverless.progress_update() to record the status, and the client side can retrieve the job status by status polling.
- Using this method, you can continuously update the current progress status or the latent image in the client application, thereby providing a better user experience.
RunPod Serverless
To use RunPod’s Serverless feature, you need to access the RunPod console, log in, and recharge credits. (Upon signing up, you automatically receive $1 credit.)
-
From the left sidebar in the console, go to the Serverless menu and click New Endpoint.
When creating an endpoint, you can use one of the pre-defined images from RunPod (such as vllm, stable diffusion), or you can use your own custom-built image from Docker Hub.
In this case, I’m going to click on GitHub Repo to automatically build an image from a GitHub repository.
If your GitHub account is already connected, you will see all the repositories associated with it. Select the repository you want to use and continue.
-
Enter the branch you want and the path to the Dockerfile. I’ll use a branch named base and the Dockerfile at the root path.
-
Next, specify the endpoint name, GPU, and deployment options.
As shown for each GPU card, costs are calculated per second. This is because you are charged for the time the worker is running.
Max Workers refers to the number of workers on standby to handle requests. Simply put, if set to 3, it means 3 ComfyUI servers are ready. (Assuming each worker runs one ComfyUI server.)
Active Workers are the workers that remain in the Ready state at all times. You will be charged for that time. You could consider this if your task is very sensitive to cold start issues.
-
Advanced Options
In Advanced Options, you can specify the worker’s region and connect a Network Volume.
If you use a Network Volume, there is a drawback that the worker’s region becomes fixed to the region you selected when you created the Network Volume. As a result, if GPU availability in that region is unstable, new workers might not be created when needed.
Queue Delay specifies how long the worker stays in the Ready state after completing a request before returning to Idle. The longer you set this, the less cold start you’ll have. However, you’ll still be charged for that time, so adjust it as needed.
-
Build & Check Workers
After creating the endpoint, you can see that the image is automatically being built.
When the build completes successfully, you’ll see that as many workers as you specified are being created.
As you can see in the image, multiple workers with the same GPU type are created in different regions, each with a different specification.
Application(Client) Side
RunPod provides several SDKs (Go, GraphQL, JavaScript, Python) to make it easier for the client to communicate with the endpoint.
I’m developing a Next.js-based web application, so I used the JavaScript SDK.
There are three steps: Preprocessing + Generation1 + Generation2. The application continuously polls for status updates during these steps, allowing the user to see the progress in real time.
Test
Here are the results of a few request tests.
From left to right: Task ID, Status, Delay Time, Execution Time, Worker ID.
Delay time is the time it takes for the worker to be ready, i.e., the cold start. Execution time is the time the task is actually running, including ComfyUI startup, model loading, and image generation time.
For each new worker, the average delay was about 13 seconds, and the execution time was about 1 minute due to the ComfyUI startup, model loading, and generation process. After that, it stabilized, and both the delay time and execution time converged to more consistent values.
Note that the delay and execution times will vary depending on the GPU specs and region, so you’ll need to run various tests.
Conclusion
One of the best things about testing RunPod Serverless was the ability to automate CI using GitHub.
Especially because I use a Model-in-Docker approach, the image is quite large, so it’s restrictive to use GitHub Actions. We would have needed separate resources and management if we tried to run CI on our own server.
However, since it’s still in Beta, you currently can’t use secrets (e.g., Huggingface tokens) in the Dockerfile, and errors sometimes occur during deployment or the process can take quite a while. We’ll have to keep an eye on it and see how it evolves.
Keep Going.

Leave a comment